69 One file, many pictures: the slot machine
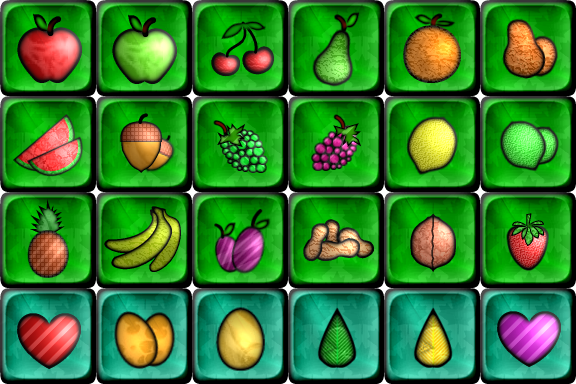
Twenty-four pictures, one file. That’s the idea this chapter is built on, and it’s the last new thing you learn in this part. Everything else you already have, because the program you build here is a slot machine, and it’s the first program in this course that you design and write completely in your own workshop. No playground link, no starter code with your places marked, no sample solution. Your folder, your editor, your program.
69.1 AI tutor
The slot machine is the graduation piece of this part, so treat it the way you would treat a graded task. The AI tutor of this part knows the starter project, the tools, and the sprite sheet of this chapter, and it answers with hints, questions, and explanations instead of finished code. That’s exactly what you need here, because the point of this exercise is that you can build it.
Hints and questions instead of finished programs, in English or German.
69.2 Many pictures in one file
Think back to the Sokoban board (Section 58.5). Five tile types meant five image files, five addresses in an array, and five loads in setup. The board looked good, and it was still a very small game with a wall, a floor, a target, and two kinds of crates.
A real game has hundreds of tiles. Every wall corner, every floor variation, every frame of a walking figure is a small picture, and loading them one by one would mean hundreds of files and hundreds of downloads. Game programmers solved that in the arcade era and have done it ever since. All the small pictures are packed into one big picture file, and the program cuts out the piece it needs at the moment it draws.
Such a file is called a sprite sheet, and the small pictures inside it are sprites. One file means one download, one loadImage, and one variable in your program, no matter how many sprites are in it.
The trick that makes cutting easy is the grid. All sprites have the same size and sit in rows and columns without gaps, so their positions follow simple arithmetic. With tiles that are 96 pixels wide and 96 pixels tall, the tile in column col and row row starts at pixel col * 96 from the left and row * 96 from the top. That’s the same grid arithmetic that placed the squares of the chessboard (Section 32.2), only the numbers are pixels inside a picture file now.
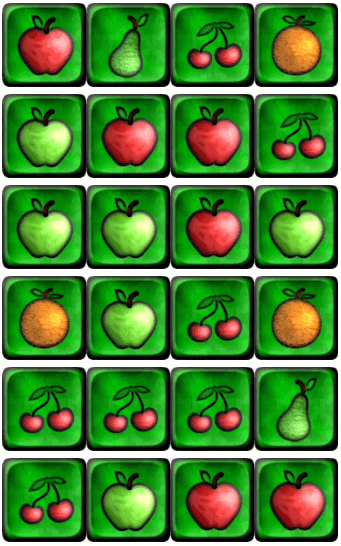
The sheet at the top of this chapter is exactly such a grid. The file is 576 pixels wide and 384 pixels tall, and it holds 6 columns and 4 rows of 96 by 96 tiles, 24 icons in total. The first three rows are fruit on green tiles, among them apples, cherries, a pear, grapes, bananas, and a strawberry. The fourth row is different: its tiles are teal, and it holds special symbols like hearts, a leaf, and a drop. Counting starts at zero here, as always, so the top left tile is column 0, row 0.
69.3 A picture inside your own project
Every image in this course so far came from an address on the internet. Your program loaded it from a web server somewhere far away, which works, but it also means your program only runs while that server does.
In your own workshop you have a better option. Pictures, sounds, and other ready-made files belong to the project, and the starter has a folder waiting for exactly that. During the starter tour it was empty and its description said “for pictures and other files your program may load later” (Section 66.3). That folder is public/, and its moment has come.
Getting the sprite sheet into your project takes two steps:
- Download the file Sheet_Fruits_Panel.png. Your browser may show the picture instead of saving it, in which case a right-click and Save image as does the job.
- Put the file into the
public/folder of your exercise copy, so thatpublic/Sheet_Fruits_Panel.pngexists.
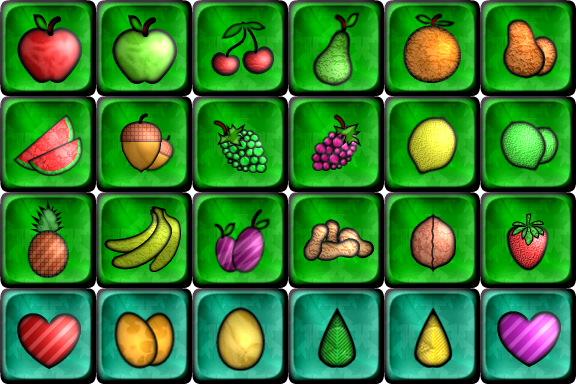
The development server takes care of the rest. Everything in public/ is served at the root of your page’s address, so the file that sits in public/Sheet_Fruits_Panel.png on your hard drive is reachable as /Sheet_Fruits_Panel.png in your program. The leading slash means “start at the root of this address”, and nothing about the address mentions the folder public itself.
Loading works exactly as it did with pictures from the internet (Section 56.2), with the p. prefix in front of the p5.js names (Section 67.5.1):
let sheet: p5.Image;

async function setup(): Promise<void> {
    sheet = await p.loadImage("/Sheet_Fruits_Panel.png");

    p.createCanvas(800, 400);
}
Two details matter in your own file. The starter’s setup is written as function setup(): void, and await only works inside an async function, so you change the line to async function setup(): Promise<void>. The starter even has a comment above setup that says so. And the variable sheet stands outside setup with let, because draw needs it too and it gets its value only when the picture has arrived.
69.4 Cutting one picture out: image with nine arguments
The image command you know takes five arguments, the picture plus where and how big it goes on the canvas (Section 56.3):
p.image(sheet, 0, 0, sheet.width, sheet.height);Run that with the sprite sheet and you get all 24 icons at once, because the five-argument version always draws the whole file. For a slot machine you need one icon, so image has a longer version that adds four more numbers.
p.image(sheet, 0, 0, 96, 96, 192, 0, 96, 96);Nine arguments, and they read in two groups of four. First comes the picture. Then four numbers for the destination, the place on the canvas, so x and y and the width and height it gets there, exactly the four you already know. Then four numbers for the source, the window inside the file, again x and y and a width and a height, this time measured in pixels of the picture file.
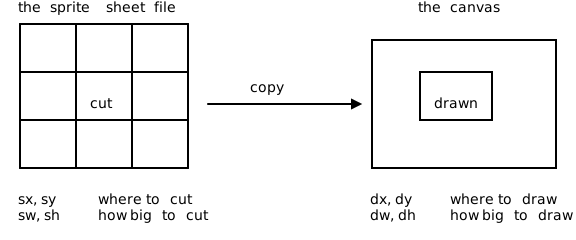
image command cuts a window out of the picture file and copies it onto the canvas. The four source numbers say where to cut and how big the window is, the four destination numbers say where the copy lands on the canvas and how big it is drawn.The line above says: take the 96 by 96 window that starts at pixel 192 from the left and 0 from the top, which is the third tile of the first row, and draw it into the top left corner of the canvas at its natural size.
Written with literal numbers this is hard to read, and the slot machine needs it four times per frame, so it belongs in a function. Two constants and one function are the whole building block:
const SPRITE_SIZE: number = 96;
const SYMBOL_ROW: number = 0;

/** Draw one symbol of the chosen row at the position x, y */
function drawSymbol(symbolIndex: number, x: number, y: number): void {
    const sx: number = symbolIndex * SPRITE_SIZE;
    const sy: number = SYMBOL_ROW * SPRITE_SIZE;

    p.image(
        sheet,
        x,
        y,
        SPRITE_SIZE,
        SPRITE_SIZE,
        sx,
        sy,
        SPRITE_SIZE,
        SPRITE_SIZE,
    );
}
sx and sy are the grid arithmetic of the sprite sheet, one multiplication each. SYMBOL_ROW picks the row of the sheet you want to work with, so changing that single number swaps the whole set of symbols. The formatter puts every argument on its own line here because the call is too long for one line, and that’s normal. Read it as the picture, then the four destination numbers, then the four source numbers.
With that function in place, four symbols side by side are a loop:
function draw(): void {
    p.background("white");

    for (let i: number = 0; i < 4; i++) {
        drawSymbol(i, i * SPRITE_SIZE, 20);
    }
}
That is not a slot machine yet. It’s the building block the slot machine is made of, and everything else in this chapter’s challenge is built from things you already know.
Nothing in the nine-argument image can produce a red squiggle or a message in the terminal, because every argument is simply a number. A mistake shows up on the canvas, so learn to read it there.
- The whole sheet, shrunk into one tile. Your call has no source window, which happens when you use the five-argument version, so p5 draws the entire file into your small destination rectangle. You see all 24 icons at once, tiny.
- The right icon in the wrong place, or the wrong icon. The two groups are swapped. Destination comes first, source second, and both groups look the same, so the swap runs happily and draws nonsense.
- Parts of two neighboring icons in one tile. The source position is off. Check that you multiplied the column and the row by 96 instead of using them as pixel values.
69.5 Your coding assistant
The slot machine is the biggest program in this book, and the coding assistant may help you build it. Connect it the way you did in Section 67.8, with the key you already have. Then read what it gives you before you keep it, because the craftsmanship requirements below apply to every line in your file, whoever typed it first.
Sign in with your school account and the page gives you a key of your own. That key is what your coding tool needs. The code below opens the page and nothing else.
Your teacher sees that you asked for a key, never what you ask the assistant.
69.6 Your challenge: build the slot machine
A slot machine is a gambling device. Reels with symbols spin, they stop one after the other, and matching symbols pay out. Your program is the harmless version of it, with credits that exist only on your canvas.
This is the graduation piece of the part, and it’s bigger than anything you have written so far. It uses drawing commands, colors, constants, arrays, loops, conditions, your own functions, the mouse, setInterval, text on the canvas, and the sprite sheet of this chapter. Nobody hands you a prepared project with // <<< comments this time. You get requirements, the way you will get them in every project from now on, and you decide what the functions are called and how the program is put together.
69.6.1 Set up your project
Follow the folder rule of this course (Section 66.5):
- Copy your clean master starter folder and name the copy
slot-machine. - Open the copy in VS Code, run
npm install, and start it withnpm start. - Put
Sheet_Fruits_Panel.pnginto thepublic/folder of the copy, as described in Section 69.3.
69.6.2 Basic requirements
Everything in this list has to work.
Pick one row. Choose any row of the sprite sheet and use its six icons as the symbols of your machine. Ignore the other three rows completely.
Four reels. Show four symbols side by side. When the program starts, each one shows a random symbol of your row, and p.floor(p.random(6)) gives you a random index from 0 to 5.
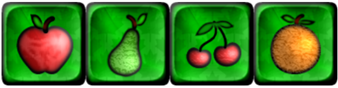
Two buttons, drawn with p5. Your program needs a “Spin” button and a “Stop” button, and you draw both yourself with a rectangle and a text label. HTML buttons are not allowed here, because this course has never taught them.

The click. Clicks arrive in a function called mouseClicked, and that function needs one connection to p5.js before it runs. The frame at the top of src/index.ts lists the functions p5.js calls for you, and the starter connects three of them. Add a fourth line, and write the matching function below in the file:
const p = new p5((sketch: p5): void => {
    sketch.setup = setup;
    sketch.draw = draw;
    sketch.keyPressed = keyPressed;
    sketch.mouseClicked = mouseClicked;
});
That single line is the only change the frame ever needs from you. mousePressed works exactly the same way if you prefer it. Which button was hit is then the rectangle hit test from the silo dashboard, four comparisons that box p.mouseX and p.mouseY into the button (Section 44.5).
Spin. A click on “Spin” starts the machine. All four reels change their symbols quickly and randomly, which is a job for setInterval (Section 52.3). Store the id it returns in a variable, because stopping the machine needs that id.
Stop. A click on “Stop” ends the spinning with clearInterval (Section 52.4), and the four symbols stay as they are. A click on “Spin” starts a new round.
The result. After stopping, your program says what the player got, as text on the canvas:
| what the reels show | text |
|---|---|
| four different symbols | No match |
| two equal symbols | Two of a kind |
| three equal symbols | Three of a kind |
| four equal symbols | Jackpot! |
The text disappears when the next spin starts. Finding the result means counting, and you have counted with arrays before. Make an array with one counter per symbol of your row, walk over your four reels, and count up the counter of each symbol you see. The largest counter in that array is your answer.
69.6.3 Advanced requirements
When the basic machine runs, make it a real game.
Buttons that show their state. Only one of the two buttons does anything at any moment. While the reels stand still, that’s “Spin”, and while they spin, it’s “Stop”. Show the difference, for example by drawing the button that does nothing in gray and the active one in a strong color. A boolean that remembers whether the machine is spinning is enough to decide it.
Credits. The player starts with 10 credits, and the number is visible on the canvas at all times.
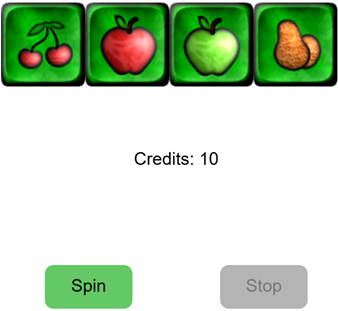
Paying and winning. Every spin costs one credit, taken when the player presses “Spin”. At zero credits no spin starts, and the canvas says why. Stopping pays out, depending on the result of the round:
| result | payout |
|---|---|
| No match | nothing |
| Two of a kind | 1 credit, the spin was free |
| Three of a kind | 2 credits |
| Jackpot! | 4 credits |
69.6.4 Craftsmanship requirements
The slot machine is judged as a piece of work, not only as a running program.
- Hand in clean code. Run
npm run formatandnpm run checkbefore you show your program, and keep going until the check is quiet (Section 68.6). - No copy and paste. Drawing a button, drawing a symbol, and rolling a random symbol happen more than once, so each of them is a function with parameters. If you find yourself copying a block and changing two numbers in the copy, you found a function.
- Meaningful names.
drawButtonandspinningsay what they are.doItandflag2say nothing. - Few global variables. Some state has to be global, like the loaded sheet, the four current symbols, and the credits. Everything a function can take as a parameter should be a parameter.
- Only what you can explain. This course has one standing rule about language and library features it hasn’t covered. You may look things up and you may ask an AI, and whatever ends up in your file, you have to be able to explain line by line. Code you cannot explain counts as wrong, no matter who wrote it. You are the programmer here, and you are responsible for the result.
When your machine spins, stops, pays out, and passes npm run check, you have finished the first program of this course that is completely yours. That is the end of this part, and the workshop it built is the one you’ll use for the rest of the book.
69.7 Check your understanding
When your slot machine runs, take the short quiz below. You answer seven questions about this chapter in your own words, and an AI reads your answers and tells you what you already understand and what you should read again. The quiz is anonymous, and answering in German is fine too.