54 Many files, one program
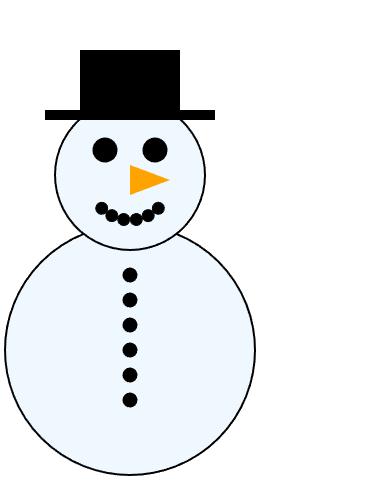
Every program you have written so far lived in a single file called index.ts. That stops here. Melting Snowman is a guessing game in the style of Hangman, and its code is spread over two files, one for the game and one for the drawing of the snowman. This chapter builds the drawing half and, with it, the skill of finding your way around a program that no longer fits on one screen.
54.1 AI tutor
Two files means a new kind of confusion, because a mistake can look like it happens in the file you are reading while it really comes from the other one. When something does not appear on the canvas, tell the tutor which file you edited and which one you expected to react.
Hints and questions instead of finished programs, in English or German.
54.2 Why programs get split into files
Splitting a program into several files is called modularity, and each file is a module. It costs a little order and pays back three things.
- You find things faster. A snowman drawing bug sends you to
snowman.ts, not into a scroll through 300 mixed lines. - Several people can work at once. One person writes the game rules while another person improves the snowman, and nobody overwrites anybody.
- A file can be reused. A module that only draws a snowman can be copied into a Christmas card program without dragging the guessing game along.
The rule of thumb is the same one you know from functions. One function has one job, and one file holds the functions that belong to one job. Melting Snowman uses index.ts for the game itself and snowman.ts for everything that draws the snowman.
54.3 One program on several sheets of paper
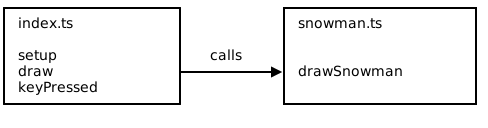
In the playground, the files of a program are not separate worlds. They are one program written on several sheets of paper, and the computer reads all sheets before it starts. A function defined in snowman.ts can be called from index.ts with no extra ceremony, exactly as if both lines stood in the same file:
The same is true for global variables. A let at the top of one file is visible in all of them, which is convenient and also a reason to give globals clear names.
Bigger TypeScript projects do not share everything automatically. There, each file lists what it needs from other files with import, and says what it offers with export. The playground leaves that machinery out so you can concentrate on the split itself, and later courses pick import and export up properly.
54.4 Drawing once instead of sixty times a second
A snowman does not move. Nothing in this program changes unless the player presses a key, so repainting the canvas sixty times a second would burn power to produce the very same picture. Two p5.js functions give you a program that draws only when there is a reason:
function setup(): void {
    createCanvas(800, 500);
    angleMode(DEGREES);

    // Draw the screen one time
    redraw();
    noLoop(); // Stop calling draw() automatically
}
noLoop() switches the automatic calls to draw off. redraw() asks for exactly one call, right now. Together they turn draw from a loop that runs forever into a command you trigger when something has actually changed. draw itself stays a normal draw, and you still never call it directly; you call redraw() and p5.js calls draw for you.
54.5 Reacting to the keyboard
Melting Snowman is played on the keyboard, so the program needs a third callback next to setup and draw. You have met keyPressed and the variable key once before, in the research exercise at the end of the Variables part (Section 19.4). There you looked them up in the p5.js reference yourself; from here on they are a regular part of the course:
function keyPressed(): void {
    numberOfKeypresses++;

    // Refresh the screen one time
    redraw();
}
p5.js calls keyPressed once for every key the player presses, and inside it the global variable key holds the character that was pressed, as a string. Pressing the A key makes key the string "a", and holding shift makes it "A". This first part of Melting Snowman ignores which key it was and only counts the presses, so every key melts the snowman a bit further. The letters start to matter when the guessing logic arrives.
What is new is the partner that keyPressed works with here. The pairing of keyPressed and redraw() is the whole event loop of this program. A key changes a variable, redraw() repaints the canvas once with the new value, and then the program waits again.
54.6 A doc comment as a specification
The file snowman.ts already contains a complete drawSnowman function that draws the snowman with all its parts, and above it sits a doc comment. That comment is not decoration; it is the specification of what the function is supposed to do, and your task is to make the code match it:
 * * 1 wrong: Lower three buttons
 * * 2 wrong: Upper three buttons
 * * 3 wrong: Left half of mouth
 * * 4 wrong: Nose
 * * 5 wrong: Right half of mouth
 * * 6 wrong: Left eye
 * * 7 wrong: Right eye
 * * 8 wrong: Hat
 * * 9 wrong: Top body part
 * * 10 wrong: GAME OVER
Reading a specification carefully is a skill of its own, and one word in this one carries most of the meaning. The parts left out are additive. Three wrong guesses do not hide the mouth half alone; they hide the parts for one, two, and three wrong guesses together, so the snowman keeps melting instead of growing back.
Additive is exactly what a “less than” comparison gives you. The nose belongs to the number 4, so it is drawn as long as the count has not reached 4:
// Nose
if (numberOfWrongGuesses < 4) {
    push();
    noStroke();
    fill("orange");
    triangle(0, 195, 0, 165, 40, 180);
    pop();
}
At zero, one, two, or three wrong guesses the nose appears. From four on it is gone and stays gone, because no larger number is ever less than 4. Wrap each part in the comparison that belongs to its line in the specification and the melting takes care of itself.
Two groups of parts need a different move. The buttons and the mouth dots are not drawn one by one but by for loops that repeat a shape six times, moving or rotating the origin between rounds. Hiding half of them means running the loop fewer times rather than putting an if around a single shape, so the number the loop starts at is what your condition should change.
54.7 Your exercise: Melting Snowman (1)
The starter code is a running program. index.ts counts key presses and hands the count to drawSnowman, and snowman.ts draws the complete snowman and ignores the count so far. You change that.
- Run it first. Press a few keys and watch nothing happen. The count rises, the picture stays, and that is the gap you close.
- Read both files. Find the call in
index.tsand the definition insnowman.ts, and follow the value from the key press to the parameternumberOfWrongGuesses. - One part at a time. Start with the nose from Section 54.6, run, and press four keys to check it disappears at the right moment. Then do the hat, the eyes, and the body parts.
- Then the loops. The mouth and the buttons come last, because they need the loop start instead of a plain
if. Test each of them with the exact number from the specification. - Play the whole melt. Press ten keys in a row and compare every step with the list in the doc comment.
This exercise comes without a sample solution on purpose, so the specification in the doc comment is your only reference. The next chapter’s exercise gives you a finished snowman.ts as part of its starter code, and comparing it with your version then is worth much more than reading it now.
54.8 Check your understanding
When your snowman melts key press by key press in the order the specification demands, take the short quiz below. You answer six questions about this chapter in your own words, and an AI reads your answers and tells you what you already understand and what you should read again. The quiz is anonymous, and answering in German is fine too.