3 From copying to creating
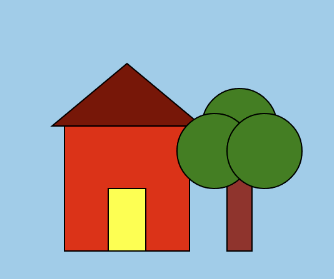
This is the first time you invent the picture instead of copying it. You’ll design your own house on paper and then bring it to life on the canvas, with a tree standing beside it, built entirely from the shapes you already know. It’ll be your house and nobody else’s.
In the Shapes exercise you typed code that was given to you. Now comes the step that makes programming exciting: you write your own program. Your task will be to draw a house with a tree beside it, using the drawing commands you already know.
There is no single correct solution anymore. Your house doesn’t have to look like anyone else’s, and that’s the point. The rules of exactness still apply, every letter, parenthesis, and curly brace still matters, but what you draw is now your decision.
3.1 AI tutor
Designing a picture of your own means many small decisions, and there is no sample solution to compare yours with. That makes the AI tutor of this part a good partner here: describe where you’re stuck, and it asks the questions that get you moving again.
Hints and questions instead of finished programs, in English or German.
3.2 Big pictures are made of simple shapes
A house looks complicated until you look closely. Then you see it’s just simple shapes stacked together:
- The walls are a rectangle.
- The roof is a triangle sitting on top of the walls.
- The door is a smaller rectangle.
- The windows are small rectangles or circles.
- The tree is a rectangle (the trunk) with a circle on top (the crown).
This is one of the most important ideas in programming: you take something big and break it into small pieces you already know how to build. You’ll use this trick again and again, not just for drawings.
3.3 Plan before you type
Don’t start by typing. Start with a pencil.
For every exercise in this Creative Coding class, have pen and paper lying on your desk, right next to your keyboard. This is not optional, it’s part of your toolkit, just like the editor.
Experienced programmers can sometimes skip the sketch because they can paint the picture in their head. That’s a skill they built through years of practice, and you’ll get there too. You build it by writing things down: sketches, coordinates, notes. So for now, the rule for you is simple. First the paper, then the keyboard.
Sketch your house on paper and treat the sheet like your canvas: the origin (0, 0) is in the top left corner, x grows to the right, and y grows down. Then write the coordinates next to the important points of your sketch. For example, if your canvas is 400 pixels wide and 500 pixels tall, your walls might be a rectangle starting at (100, 250), 200 wide and 150 tall. Where are the corners of the roof triangle? Where does the door start?
Your first guesses won’t be perfect, and they don’t have to be. A plan on paper just saves you from guessing blindly at the keyboard.
The best paper for your sketch is graph paper, the paper from your math notebook with small squares of 5 by 5 millimeters. Let one square stand for 10 pixels. A canvas of 400 by 500 pixels then becomes 40 by 50 squares, which fits comfortably on an A4 page. Draw your house at that size, then use a ruler to find the coordinates: count the squares and multiply by 10, or measure in millimeters and multiply by two, and you have the pixel value for your code.
Working this way trains two skills at once. You learn to handle coordinates with your own hands, not just in code. And you learn to design a picture before you build it, which is how designers and artists work too: first the sketch, then the implementation. In a course called Creative Coding, that design step is just as important as the code.
3.4 Draw in the right order
The computer runs your statements from top to bottom, and every new shape is painted on top of what’s already there, like layers of paint. So the order of your statements decides what covers what:
- First the background: the sky.
- Then the large shapes: the walls, the roof, the tree.
- Then the details that lie on top of other shapes: the door and the windows on the walls, maybe apples on the tree.
If your door disappears, you probably drew it before the walls, and the wall rectangle painted over it. Move the door statement further down, and it comes back.
3.5 Give your shapes colors
You already know the color commands from the Shapes exercise: fill sets the color inside shapes, stroke sets the line color, and strokeWeight sets the line thickness. These commands are settings, not actions. They don’t draw anything themselves. They change how every shape after them is drawn, until you change the setting again:
fill("red");
rect(100, 250, 200, 150);   // red walls
rect(180, 330, 40, 70);     // still red! fill is still "red"

fill("saddlebrown");
rect(180, 330, 40, 70);     // now the door is brown
The page HTML color names lists all the color names you can use, from "skyblue" to "saddlebrown".
3.6 Your exercise: House
Now it’s your turn. Open the House exercise in the web playground and write a program that draws a house with a tree beside it, built from rectangles, circles, triangles, and lines.
A good way to work:
- Sketch your house on graph paper and note the coordinates.
- Create the canvas and paint the background.
- Add one shape at a time. Run the program after every shape, look at the result, and adjust the numbers until it fits. Changing coordinates again and again is completely normal. Professional programmers work exactly like this: try, look, adjust.
- Keep your code well formatted while you go: indent the statements inside the curly braces and write one statement per line. Tidy code makes it much easier to find the shape you want to change.
The example picture in the exercise is only an idea, not a template. Add whatever you like: a sun, a fence, clouds, a second tree, a cat on the roof. When your program runs and the picture on the screen matches the picture in your head, you’ve built exactly what you planned.
3.7 Check your understanding
When you’ve finished the exercise, take the short quiz below. You answer seven questions about this chapter in your own words, and an AI reads your answers and tells you what you already understand and what you should read again. The quiz is anonymous, and answering in German is fine too.