12 Your first formula: snapping to a grid
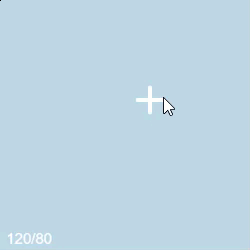
You’ll build a little marker that chases your mouse across the canvas. But it won’t glide there smoothly: instead it jumps in fixed steps, clicking into place at the points of an invisible grid. As it moves, a small label in the corner shows its position, always landing on neat, round numbers.
Open a presentation program and drag a shape around. Instead of moving smoothly, the shape jumps in small steps, so that shapes line up neatly without fiddling. This behavior is called snapping: the shape snaps to an invisible grid. In this chapter you build exactly that. A marker follows the mouse, but instead of following it pixel by pixel, it jumps from grid corner to grid corner, every 40 pixels. To get there, you’ll declare your own constants and meet data types properly. Then you’ll write your first real formula.
12.1 AI tutor
A formula that produces the wrong number is hard to spot, because it looks perfectly fine on the screen. The AI tutor of this part goes through a formula with you step by step, with your own values.
Hints and questions instead of finished programs, in English or German.
12.2 Constants you declare yourself
The starter code of the Snapping exercise begins with two lines you haven’t written yourself before:
const snap: number = 40;       // marker must snap every 40 pixels
const markerSize: number = 10; // size of marker
Read the first line from left to right, piece by piece:
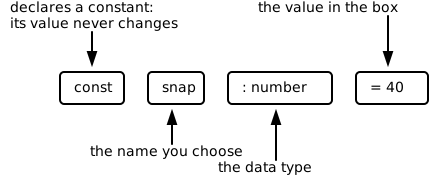
const declaration piece by piece.The data type names the kind of value the constant holds; it gets a section of its own in a moment. From now on, you write snap in your code instead of the number 40. And the semicolon at the end closes the statement, as always.
You saw the advantages of constants in the soccer field project: a name like snap tells the reader what the number means, and the value lives in one place. Change the 40 to 50 and the whole program uses the new grid size. TypeScript also protects a constant. If a later line tries to give snap a new value, you get a red squiggle immediately.
12.3 Every value has a data type
Every value in a program has a data type, the kind of value it is. Three types matter most in this course:
numberis any numeric value: 40, 3.25, -10, 0. Every coordinate, size, and angle you’ve used so far is a number.stringis text. A string is written in quotes, and you’ve been using strings since your very first program: every color name like"lightblue"is a string.booleanis the smallest type of all: its only values aretrueandfalse. Booleans answer yes/no questions, and you’ll meet them in a few chapters.
The data type in a declaration is a promise: const snap: number = 40; promises that snap holds a number. TypeScript holds you to it. Try const snap: number = "hello"; and the spell checker for code marks the line immediately, because text is not a number.
In this course, every constant and every variable you declare must have an explicit data type, like : number or : string. Honestly, this is not technically necessary, because TypeScript can usually figure out the type on its own (it sees the 40 and knows it’s a number). But you are here to learn, and writing the type out forces you to think, every single time, about what kind of value you’re working with. That habit will pay off for years. Like showing your work in math class: the shortcut exists, but not while you’re learning.
12.4 Two kinds of constants, two kinds of names
Look at the names SCALE and snap. Both are constants, but one is written in capital letters and the other one is not. Programmers use constants for two different jobs, and the name shows the job:
- Global configuration constants like
SCALEandMARGINin the soccer field project sit at the top of the program, outside every function. They are settings for the whole program, meant to be found and tweaked easily. Their names are written in ALL_CAPS, with underscores between words, for exampleMAX_SPEED. - Ordinary constants like
snap,markerSize, or thexandyyou’ll compute in a moment live inside a function. They simply hold a value that doesn’t change after it’s set. Their names are written in camelCase: first word lowercase, every further word capitalized.
The computer doesn’t care about these conventions, but people reading your code do. An ALL_CAPS name signals “program setting, tweak me here”. A camelCase const signals “this value won’t change”. Make const your default choice. For the rare value that must change while the program runs, TypeScript has the keyword let, and you’ll meet it soon.
12.5 The snapping formula
Now for the heart of the exercise. The marker may only sit on grid corners: 0, 40, 80, 120, 160, or 200. The mouse, however, is somewhere in between, say at mouseX = 130. Which corner is the nearest one?
You can find it in three steps, and each step is simple:
- Divide the position by the grid size: 130 / 40 = 3.25. Read that as “the mouse is 3.25 grid squares from the left edge”.
- Round to the nearest whole number: 3.25 becomes 3. Now you know the nearest corner is the third one.
- Multiply back by the grid size: 3 × 40 = 120. That’s the corner’s position in pixels.
The p5.js function round does the rounding for you. round(3.25) returns 3, round(3.6) returns 4, and round(3.5) rounds up to 4, just like in math class. Put the three steps together and you get your first formula, written in one line and stored in a constant:
const x: number = round(mouseX / snap) * snap;
const y: number = round(mouseY / snap) * snap;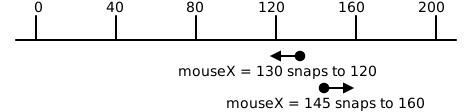
Storing the result in a constant beats writing the formula into every parameter. You need the value several times, for both marker lines and for the text output, and the computer then calculates it only once. A name like x with the formula next to it also reads better than the same formula repeated four times. Note the names: x and y are camelCase constants inside a function, computed fresh on every mouse movement, and never changed after that.
12.6 Writing text on the canvas
The exercise has a second task: show the marker’s current position, like 120/160, in the lower left corner of the canvas. Two new tools make that possible.
The first is the command text. It draws characters on the canvas, at a position you choose:
text("hello", 5, 195);The first parameter is a string, and the two numbers are the position of the text on the canvas. Text is drawn in the current fill color, so set fill before drawing it, and use noStroke(), which switches the outline off, so the letters don’t get one.
The second tool solves this puzzle. x and y are numbers, but text wants a string. A template string builds one from the other:
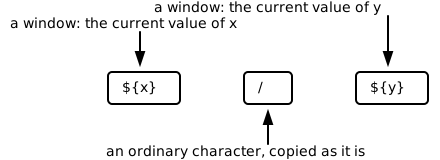
text(`${x}/${y}`, 5, height - 5);A template string is written between backticks `, not normal quotes. Inside it, ${...} is a window: the computer inserts the current value of whatever is between the braces. If x is 120 and y is 160, the result is the string 120/160.
On an Austrian or German keyboard, the backtick ` hides on the key right of the ß: press Shift together with that key, then press the space bar once. The extra space is needed because it’s an accent key (Akzenttaste). The keyboard waits to see if you want to put the accent on a letter, and the space bar says “no letter, just the character itself”.
One detail in that statement deserves a close look: height - 5. Where mouseX and mouseY were your first system variables, width and height are your next two. They always hold the size of the canvas, as set by createCanvas. So height - 5 means “5 pixels above the bottom edge”, no matter how big the canvas is. Remember these two variables, because they play the main role in the next chapter.
12.7 Seeing the exact mouse position
A practical problem shows up the moment you test a program with your paper notes in hand. You cannot put the mouse on the pixel (130, 45) by hand. The canvas has no ruler, one pixel is far smaller than the tip of the pointer, and nothing on the screen tells you where you actually are.
The fix is debug output: one temporary line that writes the numbers your program is working with onto the canvas, purely so that you can read them.
text(`${mouseX}/${mouseY}`, 5, 15);With that line in mouseMoved, the live mouse position appears in the upper left corner and updates as you move. Hitting an exact position is easy now: move roughly to where you want to be, watch the numbers, and nudge the mouse until they read what your paper says. Then check the rest of the picture.
Watch out for one thing. Text is paint like everything else, so debug output that is never erased turns into a smeared blob after a few movements. In a function that repaints the canvas anyway, like mouseMoved in this program, the old numbers disappear with everything else. In a function that doesn’t repaint, clear just the spot you write in: draw a small filled rectangle first and put the text on top of it.
fill("black");
rect(0, 0, 60, 20);
fill("white");
text(`${mouseX}/${mouseY}`, 5, 15);
Debug output costs a few lines and answers the question every programmer asks when a program misbehaves: which numbers does it actually have? Add it whenever you want to know, and delete it when you’re done. The term is worth remembering, because you’ll hear it for the rest of your programming life.
12.8 Your exercise: Snapping
Time to build the snapping marker. Work in this order:
Calculate by hand. Five mouse positions on the 200 by 200 canvas are waiting in the table below. Run the formula on paper for each one: divide, round, multiply. The first row is filled in as a model. Watch the last row closely, because 2.5 rounds up, just like in math class.
Mouse position Snap x / Snap y / Snap Snapped position (130, 45) 40 (130 / 40) = 3.25 (45 / 40) = 1.125 (3 * 40, 1 * 40) -> (120, 40) (199, 60) 40 (20, 180) 40 (5, 199) 40 (100, 100) 40 Type the formulas for
xandyintomouseMoved, then draw the marker: a horizontal and a vertical line through (x,y), each usingmarkerSize, just like the crosshairs in the previous exercise.Add the text output in the lower left corner with a template string.
Test against your paper notes. Add debug output for the mouse position (Section 12.7), so the raw position sits in the upper left corner while your snapped position sits in the lower left. Steer to each of the five positions from your table and compare the snapped position with your prediction. Delete the debug line when everything matches.
The look of the marker is yours to choose; the sample uses white lines on the light blue background. The snapping behavior, however, must be exact: corners only, every 40 pixels.
12.9 Check your understanding
When you’ve finished the exercise, take the short quiz below. You answer seven questions about this chapter in your own words, and an AI reads your answers and tells you what you already understand and what you should read again. The quiz is anonymous, and answering in German is fine too.