31 Mesh: a loop inside a loop
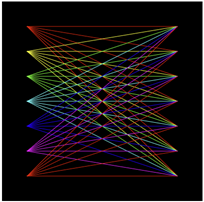
Look at the picture and try to count the lines. Seven points on the left edge, seven on the right, and a line from every left point to every right point, 49 lines in total. Typing them would be madness, and a single loop won’t do it either, because a single loop can only walk one row of points. This chapter introduces the tool for “every-with-every” drawings: the nested loop, a loop inside another loop. Nested loops draw grids, game boards, and patterns, and they come with one famous beginner bug that you’ll meet in a controlled experiment before it can meet you.
31.1 AI tutor
Two loops working inside each other are harder to read than any single loop. If your mesh shows only one bundle of lines instead of the full weave, or the colors don’t land where you wanted them, show the tutor your two loops and tell it which picture you expected.
Hints and questions instead of finished programs, in English or German.
31.2 One fan first
Start small. The first stage of the mesh connects the seven left points to a single point on the right edge. The left points sit at (MARGIN, left) with left running from 50 to 350 in steps of 50, and the target sits at (width - MARGIN, right):
let left: number = MARGIN;
while (left <= SIZE - MARGIN) {
    let right: number = MARGIN;
    line(MARGIN, left, width - MARGIN, right);

    left += MARGIN;
}
One thing looks odd on purpose: the target’s height lives in a variable right, although it never changes. right is 50, every line ends at the same point, and the loop draws one fan. The variable is preparation. In the next stage, right starts moving, and the line statement is already written for it.
31.3 The loop inside the loop
Now the real mesh, where every left point connects to every right point. Think it through for a single left point, say left = 50. You need lines to right = 50, 100, ... , 350. That is a while loop, and you can already write it. The trick is where it goes. The loop body of the outer loop may contain any statements, and a loop is a statement. So the whole inner loop moves into the outer body:
let left: number = MARGIN;
while (left <= SIZE - MARGIN) {
    let right: number = MARGIN;
    while (right <= SIZE - MARGIN) {
        line(MARGIN, left, width - MARGIN, right);
        right += MARGIN;
    }

    left += MARGIN;
}
Play computer, but zoom out. For the outer loop, the entire inner loop is just one statement of its body. Outer round one sets left = 50, and the body runs; right starts at 50, the inner loop draws all seven lines of the first fan, and ends. Then left += 50, the outer check passes, and the body runs again from the top. let right = MARGIN; makes the inner loop start fresh, and the second fan appears. Seven fans of seven lines: 49.
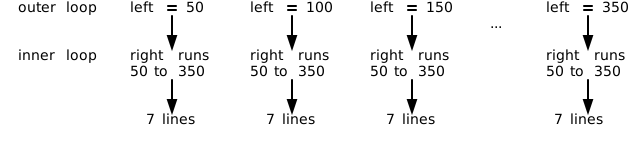
Watch the two variables move: right runs fast, a full lap per fan, while left moves slowly, one step per lap. You have seen this rhythm before, in the number systems chapter, where the ones digit turns fast and the tens digit slow (Section 24.2). Nested loops count exactly like digits do.
Imagine the line let right = MARGIN; moved above the outer loop. Only the first fan would appear. Why? The inner loop runs once, leaves right at 400, and nothing ever resets it. In every later outer round, the inner check right <= 350 is false immediately, and the inner loop runs zero times. The rule: initialize the inner loop variable inside the outer loop’s body, so every fan starts fresh. Once your own mesh runs, produce this bug on purpose; you will recognize the “only the first row shows up” picture forever.
31.4 Where a statement sits decides how often it runs
The last stage colors the mesh. All lines of one fan share a color, and each fan’s hue is 60 steps further around the HSB color wheel (Section 14.4). You know the tool, a running value:
let lineColor: number = 0;The interesting question is where the stroke call goes. In a nested loop, there are three different places, and they mean three different things:
- Before both loops: runs once. One color for the whole mesh.
- In the outer body, before the inner loop: runs once per fan. All seven lines of a fan share a color; the next fan gets the next color. This is what the mesh needs.
- In the inner body: runs once per line, 49 times. Every line gets its own color, like the gradient of the colored rays.
The same choice you made for the rays’ update line (inside the loop or after it) returns here, one level bigger. Placement is not cosmetics; it decides how often a statement runs and what the picture shows.
31.5 Your exercise: Mesh
The exercise walks the same three stages as this chapter, and in the playground each stage has its own goal picture. Solve them strictly in order.
- Step 1: one fan. The starter code brings the canvas, the constants, and a fixed
stroke("lime"). Write a single while loop overleft, with the target height in a variablerightthat stays atMARGINfor now, exactly as in the fan section above (Section 31.2). The anchor points sit at 50, 100, and so on up to 350, seven per edge. - Step 2: the mesh. Wrap the
linestatement in the inner loop overright. Keeplet right = MARGIN;inside the outer body, and give the inner loop its own update. Run it; the full mesh with its 49 lines should appear. - Step 3 (advanced): colors. Put
colorMode(HSB);intosetupand remove the fixedstroke("lime"). Declarelet lineColor: number = 0;before the outer loop, setstroke(lineColor, 100, 100);in the outer body before the inner loop, and addlineColor += 60;at the end of the outer body. One color per fan, around the color wheel. - Experiment. Move the
strokecall and the+= 60into the inner body and run again; now every one of the 49 lines gets its own color. Decide which version you find more beautiful, then restore the exercise’s version.
31.6 Check your understanding
When all 49 lines are in place and every fan wears its own color, take the short quiz below. You answer six questions about this chapter in your own words, and an AI reads your answers and tells you what you already understand and what you should read again. The quiz is anonymous, and answering in German is fine too.