16 Build your own color picker
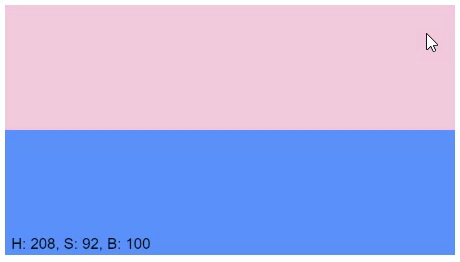
In the chapter about mixing colors you used an online color picker, where you point at a color and read off its numbers. By now you know enough to build one yourself. The project brings together almost everything from this part: mouse events, the HSB color model, the system variables width and height, constants with explicit types, and text output with a template string. And it hides a small surprise, because the program remembers your chosen color without a single variable of your own.
16.1 AI tutor
The color picker brings together almost everything from this part, which also means many places where it can go quiet or show the wrong color. The AI tutor of this part helps you narrow down which half of the program is at fault.
Hints and questions instead of finished programs, in English or German.
16.2 Two halves, two jobs
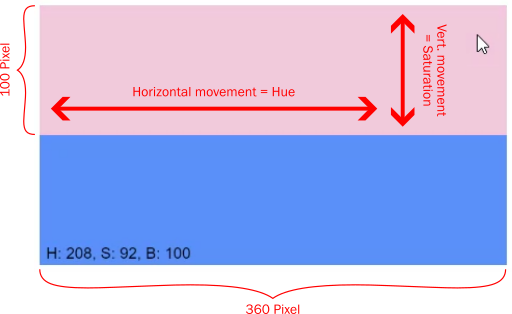
The picker splits its canvas into two halves with different jobs. The top half is the preview: it changes its color on every mouse movement. Moving the mouse to the right walks the hue along the rainbow, moving it down increases the saturation. The bottom half is the result: when the user clicks, it takes on the current color and keeps it until the next click. Next to it, in the lower left corner, the program writes the HSB values of the chosen color, so the user can copy them into another program.
16.3 A canvas size with a purpose
Look at the measurements in the layout picture. The canvas is 360 pixels wide, and the hue scale runs from 0 to 360. The top half is 100 pixels tall, and saturation runs from 0 to 100. That is no coincidence. It’s the whole trick of this program. The mouse position doesn’t have to be converted at all, because it is the color. mouseX is the hue, mouseY is the saturation, and the brightness simply stays at 100:
function mouseMoved() {
  fill(mouseX, mouseY, 100);
  rect(0, 0, width, height / 2);
}
The rect statement covers exactly the top half: its corner is (0, 0), its width is the canvas width, and its height is half the canvas height. Notice what is not here. There is no background call. The rectangle repaints the whole preview by itself, and the bottom half must not be erased anyway, because it holds the chosen color.
16.4 A second mouse event: mouseClicked
The mouse can do more than move. When you press and release a mouse button, that’s a click, and p5.js treats it as an event of its own. Write a function called mouseClicked, and p5.js calls it automatically once per click:
function mouseClicked() {
  // runs once for every click
}
Everything you know about mouseMoved applies here too: the name is an agreement between you and p5.js, so a typo like mouseclicked gives you a function that is never called, without any error message. Inside mouseClicked, the system variables mouseX and mouseY hold the position where the click happened.
16.5 Freezing the chosen color
When the click arrives, the program reads the color from the mouse position and stores the two interesting values in constants:
const colorHue: number = mouseX;
const colorSaturation: number = min(100, mouseY);
The second line needs a moment of thought. The user may click anywhere on the canvas, including the bottom half, and there mouseY runs up to 200. A saturation of 200 doesn’t exist; the scale ends at 100. The function min from the responsive robot chapter solves that: min(a, b) returns the smaller of the two values, so min(100, mouseY) caps the saturation at 100. In the top half, where mouseY is at most 100, min changes nothing. Used like this, min is a guard that keeps a value inside its allowed range.
With the two constants in hand, the rest of mouseClicked is drawing you already know. Set fill(colorHue, colorSaturation, 100), cover the bottom half with a rect, then switch the fill to black and write the values with a template string:
text(`H: ${colorHue}, S: ${colorSaturation}, B: 100`, 5, height - 5);Mind the order: the text must be drawn after the rectangle, or the freshly painted bottom half covers it up.
16.6 A program that remembers without a variable
One thing about the color picker is worth noticing before you build it. The program remembers the chosen color between events, across hundreds of mouseMoved calls, and yet it declares no global variable. The memory is the paint itself: nothing ever repaints the bottom half except the next click, so the color simply stays on the canvas. That works here because the program only has to remember one thing, and that thing is literally a color. In the next chapter, a program has to remember a growing list of values, and there paint alone won’t be enough.
16.7 Your exercise: Color picker
Build the picker in this order:
- Set the stage in
setup. Create the 360 by 200 canvas, switch to HSB withcolorMode(HSB), and addnoStroke()so the rectangles have no outlines. Paint the whole canvas with a starting color; the sample usesbackground(0, 100, 100), a fully saturated red. - Fill
mouseMoved. Set the fill color from the mouse position and cover the top half with a rectangle. - Fill
mouseClicked. Declare the two constants with explicit data types, including theminguard, paint the bottom half in the chosen color, and write the HSB values in black in the lower left corner. The text is a format promise:H: 208, S: 92, B: 100, with exactly these letters, colons, and commas. - Test the tool. Move the mouse along the top edge and watch the preview walk through the rainbow, then move it downward and watch the colors fade toward white. Click in the top half and check the bottom half and the text. Finally, click deep in the bottom half: the saturation in the text must never climb above 100, because the
minguard caps it.
16.8 Check your understanding
When you’ve finished the exercise, take the short quiz below. You answer six questions about this chapter in your own words, and an AI reads your answers and tells you what you already understand and what you should read again. The quiz is anonymous, and answering in German is fine too.