11 Variables: values with a name
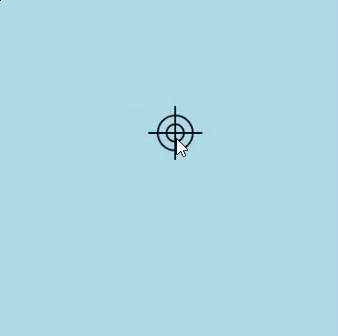
This is your first interactive program. You’ll build a set of crosshairs, two thin lines (one horizontal, one vertical) crossing at a single point, wrapped by two circles like an aiming reticle in a game. And they won’t sit still: as you slide the pointer around the canvas, the whole crosshairs glides along with it, always centered right where you’re pointing.
Every program you’ve written so far draws one picture, and that picture never changes. The house stands still. The rings don’t move, and the smiley keeps smiling. In this part of the course your programs come alive. They react to the mouse, and when a value changes while the program runs, the picture changes with it. The idea that makes all of this possible is the variable.
11.1 AI tutor
This part of the book has its own AI tutor, and every chapter of the part links to it. It knows the material of the Introduction part plus everything this part teaches, so from now on you can ask it about variables too.
Hints and questions instead of finished programs, in English or German.
11.2 A variable is a named place for a value
A variable is a place in the computer’s memory where a value is stored, with a name attached to it. Think of a small box with a label: the label is the name, and inside the box sits the current value. Whenever your code uses the name, the computer opens the box and takes out whatever is inside right now. The word “variable” comes from vary, because the content of the box can change while the program runs.
You’ve already met a close relative. In the soccer field project you used SCALE and MARGIN, named values that are set once and never change. Those are constants. A variable works the same way, with one difference: its value may be replaced while the program is running. That difference sounds small, but it’s exactly what a still picture needs to become an interactive program.
11.3 p5.js keeps some variables up to date for you
The easiest way to see a variable in action is to use one that p5.js manages for you. These built-in variables are called system variables. You never create them and you never change them yourself: p5.js does that, and your code just reads them by name.
The two system variables you’ll use today are mouseX and mouseY. They always contain the current position of the mouse on the canvas. mouseX is the distance from the left edge, mouseY the distance from the top edge. Move the mouse, and p5.js immediately puts the new position into the two boxes. So this statement draws a circle wherever the mouse is at the moment the statement runs:
circle(mouseX, mouseY, 20);The value inside mouseX is always a number. Every value in a program has a data type, the kind of value it is, and for mouseX and mouseY that type is number. You’ll learn more about data types in the next chapter.
11.4 Code that runs when something happens
Reading mouseX is only half the story. All your code so far lives in the setup function, and setup runs exactly once, when the program starts. If you draw a circle at mouseX inside setup, you get one circle at the mouse’s starting position, and nothing ever moves again.
To follow the mouse, you need code that runs again and again. p5.js gives you a way to do that. Write a function called mouseMoved, and p5.js calls it automatically every time the mouse moves across the canvas. You write that function exactly like setup, with the word function, a name, and the statements between curly braces. Only the name is different, and the name is what tells p5.js when to run it:
function setup() {
  createCanvas(200, 200);
}

function mouseMoved() {
  background("lightblue");
  circle(mouseX, mouseY, 20);
}
A function like mouseMoved is called an event function, because the movement of the mouse is an event, and p5.js reacts to the event by running your function. The program now works like this: setup runs once and creates the canvas. Then the program waits. Every time you move the mouse even one pixel, p5.js runs mouseMoved once, and your drawing code runs with the fresh values in mouseX and mouseY.
Exactness matters here in a sneaky new way. The name mouseMoved is an agreement between you and p5.js. If you type mousemoved or MouseMoved, you don’t get an error message: you simply get a function that p5.js never calls, and nothing happens when you move the mouse. If your program stays silent, check the spelling of the function name first.
Look at the background("lightblue") at the top of mouseMoved. It repaints the whole canvas on every mouse movement, and that erases the circle from the previous position. Without that line, every position leaves its circle behind and the canvas fills up with smears. Try removing the line later in the exercise, watch what happens, then put it back.
When the Crosshairs program starts, you see nothing but the light blue background. Nothing is broken: all the drawing code sits in mouseMoved, so the first crosshairs appears the moment the mouse first moves across the canvas.
11.5 Calculating inside a parameter
Crosshairs are more than a dot at the mouse position. You draw a horizontal line, a vertical line, and two circles, all centered on the mouse. The horizontal line should start 15 pixels left of the mouse and end 15 pixels right of it. The command line takes four parameters, the x and y of its starting point followed by the x and y of its end point. You don’t need to know the mouse position in advance for either of them, because a parameter can contain a small calculation:
line(mouseX - 15, mouseY, mouseX + 15, mouseY);When the statement runs, the computer takes the current value of mouseX, subtracts 15 for the starting point, adds 15 for the end point, and draws the line. Say the mouse is at (120, 80): the line runs from (105, 80) to (135, 80), exactly 30 pixels wide and centered on the mouse. The vertical line works the same way, with the calculation on mouseY.
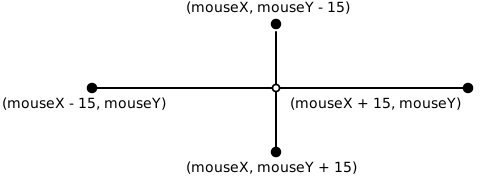
mouseX and mouseY; the center is the mouse position itself.The two circles are easier: their center is simply (mouseX, mouseY), no calculation needed. Use noFill() before drawing them, like you did for the Olympic rings, so only their outlines appear and they don’t cover the lines underneath.
11.6 Your exercise: Crosshairs
Imagine you’re building a balloon shooting game. The player needs crosshairs that follow the mouse to aim. That’s your task: crosshairs made of two lines and two circles, always centered on the mouse.
Pen and paper first, because this is your first sketch where the coordinates are formulas instead of numbers. Draw the crosshairs large on graph paper, mark the center point, and label it (mouseX, mouseY). Then copy the table below onto your paper and complete it. The first row is done for you as a model:
| Point | Coordinates as formulas | Mouse at (120, 80) | Mouse at (40, 150) |
|---|---|---|---|
| Horizontal line, left end | (mouseX - 15, mouseY) |
(105, 80) | (25, 150) |
| Horizontal line, right end | |||
| Vertical line, upper end | |||
| Vertical line, lower end | |||
| Center of both circles |
The second column is the important one: you can’t write a plain number there, because the center moves. The formula is the coordinate. The last two columns are practice at reading a formula. You play the part of the computer, put a value into mouseX and mouseY, and work out what the parameter becomes.
Then head to the playground:
- Put your drawing code into the
mouseMovedfunction, below thebackgroundstatement that’s already there. - Start with the two lines, run the program, and move the mouse across the canvas to test.
- Add the two circles with
noFill(). In the sample, the line arms are 15 pixels long and the circles have diameters of 10 and 20, but you can design your own crosshairs, as long as everything stays centered on the mouse. - Test what you can actually see. Nobody can place a mouse on the pixel (120, 80) by hand, so test the behavior instead. Move the pointer slowly all over the canvas and check that the crossing point stays right under the tip of the pointer, that the arms keep the same length in all four directions, and that the circles stay centered on the crossing point. If the crosshairs drifts away from the pointer, a plus and a minus have swapped places in your formulas.
11.7 Check your understanding
When you’ve finished the exercise, take the short quiz below. You answer six questions about this chapter in your own words, and an AI reads your answers and tells you what you already understand and what you should read again. The quiz is anonymous, and answering in German is fine too.