2 Your first program
By the end of this chapter you’ll have written your very first real program and watched a small arrangement of shapes appear on the canvas. You’ll get there by typing the code exactly as it’s given, one character at a time, and seeing for yourself how a program comes to life. It’s a small result, but it’s entirely yours. This is the moment programming stops being an idea and starts being something you do.
2.1 AI tutor
Your first program has to be typed exactly right, so small mistakes are part of the deal. When the playground shows an error message you can’t make sense of, the AI tutor of this part helps you read it.
Hints and questions instead of finished programs, in English or German.
2.2 Where you’ll write code
Professional developers write code in powerful programs like Visual Studio Code. Tools like that are great, but before you can even start, you have to install them, add extensions, download dependencies, and configure many settings. That’s a lot of setup before the first line of code.
In this course you’ll skip all of that. You’ll write your code in a simple web playground that runs in your browser. There’s nothing to install: you open a link, and you’re ready to program. The playground guides you through structured exercises. For each exercise you see a description of your task, an editor where you type your code, and a preview area where your program runs and shows its result.
2.3 Every keystroke matters
Here’s the most important lesson of your first exercise, and maybe of the whole course: computers take you literally. A computer doesn’t guess what you meant. It does exactly what your code says, character by character.
For a computer, these two lines are completely different:
circle(200, 260, 360);
Circle(200, 260, 360);
The first one draws a circle. The second one is an error, because the command is called circle with a lowercase c, and Circle with an uppercase C is a name the computer doesn’t know. One single letter decides whether your program works.
The same is true for every parenthesis (, every comma, every semicolon ;, and especially every curly brace { and }. Curly braces always come in pairs: every opening { needs a closing }. Forget one, and the computer gets confused about where your code begins and ends.
This exactness can feel strict at first. But it’s also good news: there is no hidden magic. If your code is exact, it works, every time, for everyone.
TypeScript itself doesn’t force you to end every statement with a semicolon: code without them still runs. In this course, semicolons are mandatory anyway: every statement ends with a ;.
There’s a good reason for this rule. In later courses you’ll meet programming languages like C, Java, and C#, and they all require the semicolon after every statement. If your fingers learn the habit now, those languages will feel familiar from day one.
2.4 A program is a sequence of statements
A program is built from statements. A statement is one instruction to the computer, like “create a drawing canvas” or “draw a line”. In your code, you write one statement per line, and each statement ends with a semicolon ;.
The computer runs your statements in order, from top to bottom, like steps in a recipe. The order matters. For example, a statement like background("pink") paints the whole canvas pink. If you draw a circle first and paint the background afterward, the pink paint covers your circle, and you’ll see an empty pink canvas.
In p5.js, you draw on a canvas. Think of it as a sheet of paper lying on your desk: the statement createCanvas(400, 500) puts a sheet on the screen that is 400 pixels wide and 500 pixels tall, and every drawing command after it draws on that sheet.
To tell a command where to draw, the canvas uses a coordinate system. You know coordinate systems from math class, but the canvas has one important difference: the origin (0, 0) is in the top left corner of the canvas.
- The x axis works as you expect: higher x values go to the right.
- The y axis is flipped: higher y values go down, not up.
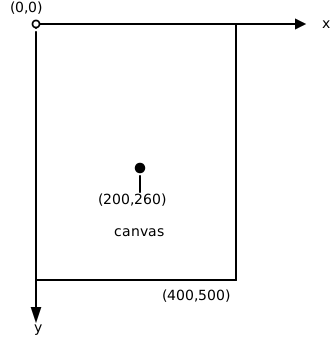
So the point (200, 260) lies 200 pixels to the right of the left edge and 260 pixels down from the top edge. The flipped y axis surprises almost every beginner, so keep it in mind when a shape doesn’t appear where you expected.
In your first exercise, the statements are drawing commands from the p5.js library. Each command has a name and, in parentheses, a list of parameters: values that tell the command what exactly to do. For example:
circle(200, 260, 360);This statement draws a circle. The three parameters are the position of the circle’s center (200 across, 260 down) and its diameter (360). Change the numbers, and the circle moves or grows. You’ll explore what each parameter means while you play with the code.
2.5 Your statements live in the setup function
Your statements don’t stand alone in the file. They sit inside a function, a named block of statements that runs as a unit. This one is named setup, and the computer runs it once when your program starts. Your first exercise has this shape, with a few more statements in the middle:
function setup() {
  createCanvas(400, 500);
  background("pink");
  circle(200, 260, 360);
}
The line function setup() { opens the block, the closing } at the very bottom ends it, and everything between them is your program. The statements inside are shifted to the right so you can see at a glance what belongs to setup.
For now, one rule is enough. Every statement you write in this part goes inside setup, between the curly braces. Later in the course you’ll write functions with other names, and functions that run at other moments.
2.6 Red squiggly lines show you your mistakes
While you type, the editor checks your code. When something is wrong, a mistyped name, a missing parenthesis, a lost curly brace, it underlines the problem with a red squiggly line, just like a spell checker underlines a typo in a text document.
When you see a red squiggle:
- Don’t panic. Squiggles are completely normal. Every programmer, including professionals, sees them all day long.
- Move your mouse over the underlined code. A small message appears that describes the problem.
- Compare your code with the example, character by character. Fix the difference, and the squiggle disappears.
Making mistakes is not failing, it’s how programming works. You type, the editor points at a problem, you fix it, and you move on. You’ll get faster at this with every exercise.
2.7 Format your code properly
Code isn’t only for computers, it’s also for people: for you next week, for your classmates, and for your teacher. That’s why programmers format their code carefully:
- Indentation: statements inside curly braces are shifted to the right by a fixed number of spaces. That makes it easy to see what belongs together.
- One statement per line: don’t squeeze several statements into one line.
- Consistent spacing: for example, one space after each comma.
In the exercise, copy the formatting exactly as you see it in the example, including the spaces at the beginning of the lines. Well-formatted code is much easier to read, and mistakes like a missing curly brace are easier to find.
2.8 Your first exercise: Shapes
Now you’re ready. Open the Shapes exercise in the web playground. Your task there has two parts:
- Type the code from the example, exactly as shown. Every character counts: uppercase and lowercase letters, parentheses, commas, semicolons, curly braces, and spaces. Take your time. Typing code is a skill of its own, and speed comes later. Lines that start with
//are comments, notes for human readers that the computer ignores. Type them in too, as typing practice. A typo in a comment is harmless. - Play with the code. When your program runs, change the parameters of the drawing commands and watch what happens. Move the circle, stretch the rectangle, try other colors. If you hover your mouse over a command name, a small tooltip shows you its documentation.
If your canvas stays empty or a red squiggle won’t go away, compare your code with the example line by line. The difference is always there, even when it’s just one character. Finding it is part of the exercise.
2.9 Check your understanding
When you’ve finished the exercise, take the short quiz below. You answer eight questions about this chapter in your own words, and an AI reads your answers and tells you what you already understand and what you should read again. The quiz is anonymous, and answering in German is fine too.