20 The if statement: programs that decide

You’ll build a canvas with three bold stripes of color and a black message bar at the bottom. The program watches where you click: hit the left stripe and the bar shows that color’s name, hit the middle or right stripe and the name changes accordingly. It looks simple, but behind it sits the most important idea of this whole part: a program that reacts differently depending on what happened.
Look back at everything you’ve written so far. Every program ran its statements from top to bottom, one after the other, every single time. The crosshairs always drew the same two lines, the color worm always moved its hue forward by the same step. Your programs could already react when something happened, thanks to event functions like mouseMoved. But they could not yet react differently to what happened, and that changes now. In this part of the course, your programs learn to make decisions.
20.1 AI tutor
This part of the book has its own AI tutor, and every chapter of the part links to it. It knows the whole course up to here, so you can ask it about conditions as well as about anything from the earlier parts.
Hints and questions instead of finished programs, in English or German.
20.2 Questions with a yes/no answer
In the snapping chapter you met the three data types of this course, and one of them was still waiting for its moment: boolean, the type with only two values, true and false. That moment is now.
A decision always starts with a question, and in a program a question is written as a comparison. A comparison takes two values and compares them. The result is a boolean, true if the answer is yes and false if the answer is no. You write comparisons with comparison operators:
| Operator | Question it asks |
|---|---|
< |
is the left value smaller? |
> |
is the left value greater? |
<= |
is the left value smaller or equal? |
>= |
is the left value greater or equal? |
=== |
are the two values exactly equal? |
!== |
are the two values different? |
Equality really is written with three equals signs, ===, and “not equal” with an exclamation mark and two of them, !==. That’s how TypeScript spells these two questions. A single = wouldn’t do, because that character is already taken: it performs an assignment, as in colorHue = 90. The two equality operators get their first real job in the dice chapter (Section 22.4).
A comparison is a calculation like any other. It just produces a boolean instead of a number. Take mouseX < width / 3. The computer first works out width / 3, then compares. If the canvas is 400 pixels wide and the mouse sits at 95, the comparison asks “is 95 smaller than 133.33?”, and the result is true. At mouseX = 250, the same comparison produces false. Which brings up the obvious question: what can a program do with a true or a false?
20.3 The if statement
The if statement is the answer. It wraps a comparison around a block of code, and the block runs only when the comparison is true:
if (mouseX < width / 3) {
  message = "Orange";
}
Read it piece by piece:
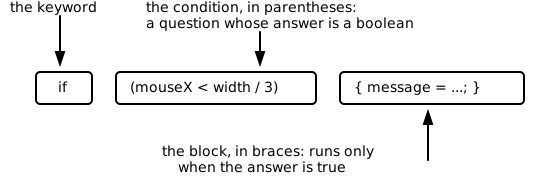
The question inside the parentheses is called the condition. When the program reaches the if statement, it evaluates the condition once. If the result is true, the block between the braces runs. If it’s false, the whole block is skipped as if it weren’t there, and the program continues after the closing brace.
Notice how the statement inside the block is indented one step further than the if itself. That indentation is not decoration: it shows the reader at a glance which statements belong to the block. From now on, code has structure, with blocks inside functions and soon blocks inside blocks. Correct indentation is how you keep that structure visible. Exactness, as always.
TypeScript would let you drop the braces when a block contains only a single statement, and you will meet such brace-less code on the web and in code that an AI writes for you. In this course we never do that: every if, else if, and else gets a block in curly braces, even for a single statement. The braces keep the structure visible, and they close a classic trap: adding a second statement to a brace-less branch later and not noticing that it doesn’t belong to the condition at all.
20.4 else if and else: one question after another
One stripe down, two to go. For the color areas you need three answers, and you get them by chaining questions. The keyword else means “otherwise”, and it adds a second block that runs exactly when the condition was false. And else if attaches the next question to that otherwise:
if (mouseX < width / 3) {
  message = "Orange";
} else if (mouseX < 2 * width / 3) {
  message = "Green";
} else {
  message = "Red";
}
The computer walks through the chain from top to bottom and takes the first branch whose condition is true. All later branches are skipped, even if their conditions would also be true. The final else has no condition at all: it catches everything that fell through all the questions above it.
That “first true wins” rule is doing quiet work in the second condition. Shouldn’t the green branch check that mouseX is between width / 3 and 2 * width / 3? It doesn’t have to. The program only reaches the else if when the first condition was false, so at that point mouseX is guaranteed to be at least width / 3. One comparison per branch is enough:
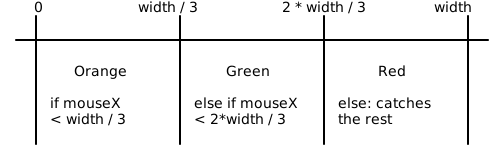
Exactly one of the three blocks runs, always. That’s the pattern to remember: a chain of if, else if, else picks one branch out of several, like a switch yard sorting a train onto one of three tracks.
20.5 A variable that gets its value in a branch
Look at the chain again. Every branch assigns to message, so the variable must be declared before the chain. The declaration looks slightly new:
let message: string;There is no = and no value: the variable is declared empty, and the if chain fills it a moment later. That’s allowed, with one strict rule attached. You must assign the variable a value before you read it. TypeScript enforces the rule. Delete the else branch and the line text(message, ...) further down gets a red squiggle, because now there is a path through the program on which message never received a value. The spell checker for code is reading your branches, and it notices what you might miss.
Why collect the answer in a variable at all, instead of calling text three times, once in each branch? Because the three branches differ in one thing only: the text. Everything else, where the text goes and how it looks, is the same. So the chain decides only the what, and a single text statement after the chain does the drawing. Less repeated code, and if you later move the message bar, you change one line instead of three.
20.6 Dressing up text
Speaking of how the text looks, so far the output from text was small and plain. The message bar deserves better, and three formatting commands help. Like fill or stroke, you call them before drawing, and they stay active until changed:
textSize(30)sets the height of the letters in pixels.textStyle(BOLD)switches to bold letters.textAlign(CENTER, CENTER)you half know from the circle tool, wheretextAlign(RIGHT)made a text end at its position. With two parameters, it centers the text on the given point, horizontally and vertically. Perfect here: pass the middle of the black bar, and the message sits centered in it, whatever its length.
20.7 Your exercise: Color areas
Now build the program. Work in this order:
Paper first. On the 400 by 200 canvas,
width / 3is 133.33 and2 * width / 3is 266.67. Copy the table below and walk the if chain through five clicks by hand. Four of the five x values sit right next to a boundary, and that’s on purpose: boundary clicks are where wrong comparisons hide. The first row is filled in as a model.Click at x mouseX < width / 3mouseX < 2 * width / 3Message 95 95 < 133.33 -> true not asked Orange 133 134 266 267 The “not asked” in the first row is the point of the whole table: once a branch has been taken, the program never looks at the questions below it.
Pick your three colors. They should be easy to tell apart. If you’d like a color combination that really works, Adobe’s color wheel suggests matching sets: try the Split Complementary option under Color Harmony.
Set the stage in
setup. Draw the three stripes as rectangles using thewidth / 3formulas, then the black message bar along the bottom, 50 pixels high.Write
mouseClicked. Repaint the black bar first, so the previous message disappears. Then set up the text formatting, declarelet message: string;, and write the if chain that fills it. Your messages must name the colors you chose in step 2. Finish with onetextstatement that draws the message centered in the bar.Test like a professional. Click in all three stripes first. Then hunt for the boundaries, and for that you need to know where you clicked: add debug output (Section 12.7) by writing
mouseXinto the message bar next to the message. Now click your way slowly across the first boundary, a few pixels at a time, and watch where the message flips. The last x with the left color and the first x with the middle color must be the 133 and 134 from your table. Do the same at the second boundary.
20.8 Check your understanding
When your color areas program works, take the short quiz below. You answer six questions about this chapter in your own words, and an AI reads your answers and tells you what you already understand and what you should read again. The quiz is anonymous, and answering in German is fine too.