18 Practice projects: circle tool and rect tool
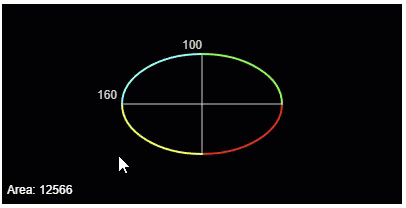
This part closes the way the last one did, with practice projects written as job briefings. Imagine you are part of a team building a graphical design application, and your job is to implement two drawing tools, one for ellipses and one for rectangles. Between them, the two tools use almost everything from this part: mouse events, the system variables width and height, constants with explicit types, the snapping formula, template strings, and text output.
Take these projects seriously. They are practice for exactly the kind of task you’ll get in an assessment. Plan on paper, work in small steps, and hand in formatted code, just as you’ve learned.
18.1 AI tutor
Both drawing tools are practice for an assessment, so work on them on your own first and turn to the AI tutor of this part when you’re really stuck. It gives you the next hint, never the finished tool.
Hints and questions instead of finished programs, in English or German.
18.2 The briefing: a circle tool
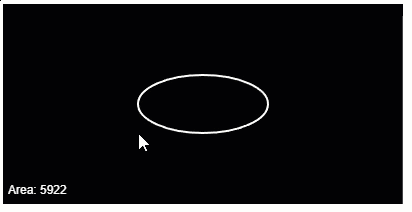
The circle tool lets the user shape an ellipse with the mouse. The basic version has three requirements:
- A centered ellipse. While the user moves the mouse, an ellipse appears, centered on the canvas. The centering must be responsive: if someone changes the parameters of
createCanvas, the ellipse stays centered without any other change to the code. - The mouse controls the size. The width of the ellipse is the distance between
mouseXand the canvas center, multiplied by two. The height works the same way withmouseY. So the further the mouse moves away from the center, the larger the ellipse grows. - The area in the corner. The lower left corner shows the area of the ellipse in the format
Area: 123, as a whole number. The area of an ellipse is the horizontal radius times the vertical radius times \(\pi\).
18.3 Three helpers you haven’t met
Three small pieces are new; everything else in the briefing is knowledge you already have.
ellipse draws stretched circles. The command circle(x, y, d) can only draw perfect circles, because it has a single diameter. Its bigger sibling ellipse(x, y, w, h) takes the center position plus a width and a height of their own, and that is exactly what the tool needs.
abs removes the minus sign. Requirement 2 talks about the distance between mouseX and the center. The obvious formula, mouseX - width / 2, gives a negative number whenever the mouse is left of the center, and a width of -140 makes no sense. The helper function abs returns the absolute value of a number: abs(-70) is 70, and abs(70) is also 70. It belongs to the same family of calculating functions as round and min. It draws nothing and only computes a value for you.
PI is \(\pi\), ready to use. For the area you need \(\pi\), and p5.js provides it as the constant PI, holding 3.14159 and so on. You write it without parentheses, because it’s a value, not a function. Since \(\pi\) has endless decimal places, the computed area has them too; wrap the calculation in round so the corner shows Area: 12566 and not a number with a long tail.
18.4 The polished circle tool
When the basic tool works, the briefing has four upgrades. Each one is a separate step; finish and test one before starting the next.
- Helper lines. Draw a horizontal and a vertical line through the center of the ellipse, dividing it into four equal quadrants.
- Snap to grid. The two diameters must snap to a grid of 20 pixels, so the width and height are always multiples of 20. That is the snapping formula from the snapping chapter, applied to a size instead of a position: divide by 20, round, multiply by 20.
- Diameter labels. Show the horizontal diameter as a number directly left of the ellipse’s center line, and the vertical diameter above the ellipse’s top center. One tip for the horizontal label: normally a text starts at the position you give; after
textAlign(RIGHT), it ends there, which is exactly right for a label that should sit left of a point. - Colored quadrants. Draw the outline of each quadrant in its own color. A quadrant’s outline is an arc of 90 degrees, and
arctogether withangleMode(DEGREES)is smiley knowledge; the starter code already switches the angle mode for you. RemembernoFillandstrokeWeightfrom the Olympic rings for outline-only drawing.
18.5 How to work, and when to peek
Work the way you’ve practiced all through this part:
Paper first. The canvas is 400 by 200, so its center is (200, 100). Complete the table below by hand before you write a single line of code. Each column header carries the formula, so you only fill in numbers. The last column belongs to the polished tool; the others to the basic one.
Mouse (x, y) Width: 2 * abs(x - 200)Height: 2 * abs(y - 100)Area, rounded Both diameters snapped to 20 (130, 45) 140 110 12095 140 and 120 (330, 180) (200, 100) (400, 0) The third row is a deliberate trap: the mouse sits exactly on the center. Work out what the tool draws there, and check later that your program does the same.
Build in requirement order. Centered ellipse first, then the size formulas, then the area text. Run after every step. Remember the crosshairs lesson:
mouseMovedhas to start by repainting the black background, or the old ellipses smear across the canvas.Test against your table. Add debug output for the mouse position (Section 12.7), steer to each position from your table, and compare the area in the corner with your prediction.
Peek with a rule. The playground shows a sample solution for this exercise. Use it when you’ve been stuck for more than a few minutes, but use it like this: read only until you understand the idea you were missing, close it, and write the code from memory. Copying with the solution open next to you feels faster and teaches nothing.
18.6 The transfer: a rect tool
The second briefing comes from the same team. The users also want a rectangle tool. The rules match the circle tool almost line for line. The rectangle stays centered on the canvas, responsive as always. The mouse controls its width and height exactly as before, distance to the center times two. The lower left corner shows Area: 123, and a rectangle makes that easier: width times height, no \(\pi\) needed.
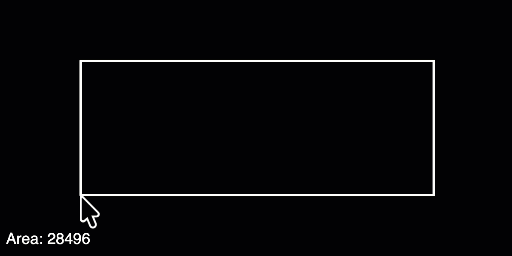
One difference deserves attention before you start. ellipse takes the position of its center, but rect takes the position of its top left corner. To center the rectangle you need the centering formula from the responsive robot: the corner sits half the rectangle’s width left of the canvas middle, and half its height above it.
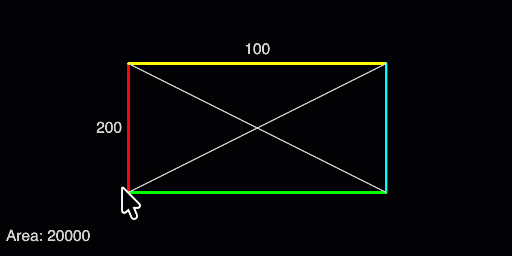
The polished rect tool mirrors the circle tool’s upgrades: the two diagonals of the rectangle instead of the helper lines, the same snapping to a 20 pixel grid, the same two dimension labels, and, instead of colored quadrants, each side of the rectangle drawn as a line in its own color.
The real challenge of this second project is that you have already solved every sub-problem once. So try to build the rect tool with as few looks at the sample solution as possible, ideally none at all. When you get stuck, don’t open the solution first; open your own circle tool code, find the matching piece, and ask yourself what has to change for a rectangle.
18.7 Check your understanding
When you’ve finished both projects, take the short quiz below. You answer six questions about this chapter in your own words, and an AI reads your answers and tells you what you already understand and what you should read again. The quiz is anonymous, and answering in German is fine too.