56 Images and orthographic worlds
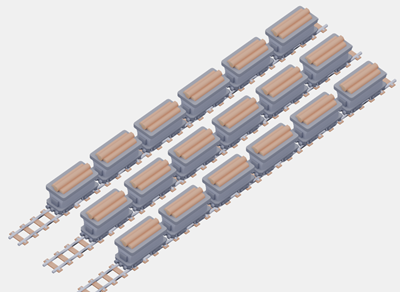
Until now, everything on your canvas came out of p5 drawing commands: circles, rectangles, lines, text. This chapter hands you a new kind of building block, the picture file. You load ready-made images into your program and place them on the canvas, and while you do that you learn the design idea behind games like the one in the goal picture above. The tiles fit together so perfectly because of the way they were rendered, and the second half of this chapter explains exactly why.
56.1 AI tutor
Two things go wrong in every first image program. The picture does not appear at all, or it appears squashed. If your canvas stays empty, tell the tutor the URL you used and where your loadImage call sits; if the picture looks wrong, describe what you passed to image.
Hints and questions instead of finished programs, in English or German.
56.2 Pictures your program loads
An image is not part of your code. The picture file lives somewhere on the internet, under an address, and your program has to fetch it before it can draw it. Fetching takes time, a few milliseconds on a good connection and much longer on a bad one, so p5 gives you a command that waits for the picture and hands it over when it has arrived.
const BASE_URL: string = "https://cddataexchange.blob.core.windows.net/images/trains";

let railroad: p5.Image;

async function setup(): Promise<void> {
    railroad = await loadImage(`${BASE_URL}/railroad-straight.png`);

    createCanvas(800, 550);
}
You met this shape in the melting snowman game, where setup loaded a font the same way. Three parts work together here.
loadImage(url)starts fetching the picture at that address.awaitmeans “wait here until it has arrived”. Without it, the next line would run while the picture is still on its way, and you would draw nothing.- A function that contains
awaithas to be markedasync, and its return type becomesPromise<void>. Read that as “this function finishes later, and when it does, it returns nothing”.
The variable railroad has the type p5.Image, the type of a loaded picture. It stands outside setup because draw needs it too, and it is declared with let because it only gets its value once the image has arrived.
56.3 Drawing a picture: image
The command that puts a loaded picture on the canvas is image, and the version this course uses takes five arguments.
image(railroad, 0, 0, railroad.width, railroad.height);The first argument is the picture. The next two are the position of its top left corner, exactly like the top left corner of a rectangle. The last two are the width and the height the picture gets on the canvas.
Every p5.Image knows its own size, so railroad.width and railroad.height are the real pixel size of the loaded file, and passing those two values draws the picture at its natural size. Any other pair of numbers stretches or squeezes it. That is a real tool when you want it (half size, double size) and a common accident when you don’t, because a picture with the wrong proportions looks subtly broken. When you change one of the two, change the other by the same factor.
56.4 Two ways to look at the world
Now to the design half of this chapter. Every 3D picture, whether it comes from a camera or from a program, is a flat image of a world that has depth, and there are two ways to flatten it.
Perspective works like your eyes and like a photo camera. Objects that are farther away appear smaller, and parallel lines (think of railroad rails running to the horizon) come closer together in the distance.
Orthographic ignores distance. An object keeps its size no matter how far away it is, and parallel lines stay parallel. Nobody sees the world this way, which is the point. Technical drawings use it because you can measure a length directly in the drawing, and 3D printing software uses it for the same reason.
56.5 Why orthographic tiles can repeat
A tile-based world is built from a few pictures used over and over. The goal picture of this chapter is drawn from exactly two images, one railroad segment and one wagon. Whether that works at all is decided by the projection.
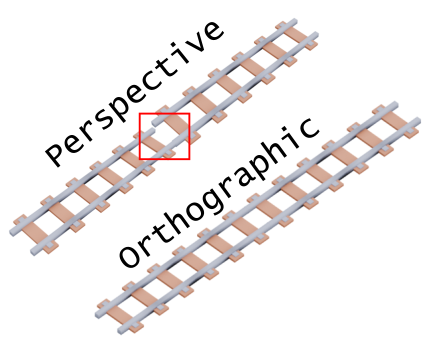
In the perspective rendering, the segment is wider at the near end than at the far end, because that is what perspective does. Put a copy next to it and the wide end meets a narrow end. The rails do not line up, and no amount of shifting fixes it, because the two ends have different sizes.
In the orthographic rendering, both ends are equally wide. One copy ends where the next one begins, so you can build a track of any length out of a single image file. Classic tile games are built on this. In the strategy game SimCity 2000, the whole city is assembled from small orthographic tiles, which is why streets and buildings snap together across the entire map. You can see a screenshot of it in the Wikipedia article about SimCity 2000.
56.6 Drawing from right to left
Pictures with a transparent background overlap, and the rule for overlapping is simple: whatever you draw later covers what is already on the canvas. In a world seen from an angle, the tile that is nearer to the viewer has to be drawn later than the tile behind it.
In this railroad world, nearer means further to the left and further down. So the drawing starts at the top right, at the farthest segment, and walks left and down toward the viewer.
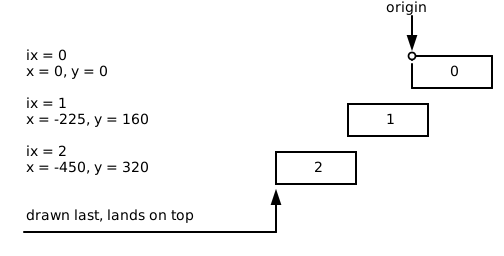
The starter code sets this up in three lines at the top of draw.
scale(0.5, 0.5);

translate(850, -100);

for (let i: number = 0; i < 5; i++) {
    drawRailroad(i);
}
scale(0.5, 0.5) halves everything, because the rendered images are large and the canvas is 800 by 550. translate(850, -100) moves the origin to the upper right corner, so that negative x values still land on the canvas. Both work on the coordinate system, exactly as in the patterns chapter (Section 35.4), and both apply to the numbers you write afterwards.
The function that draws one segment turns an index into a position.
/** Draw a railroad segment */
function drawRailroad(ix: number): void {
    image(railroad, -RAILROAD_WIDTH * ix, RAILROAD_HEIGHT * ix, railroad.width, railroad.height);
}
Segment 0 lands at the origin. Segment 1 lands one width to the left (a negative x) and one height down. The loop counts up, so each new segment appears nearer to the viewer than the one before, which is exactly the order the overlap needs.
56.7 Your exercise: Orthographic Rendering
The exercise starts with a working track of five railroad segments and asks you to put a train on it.
- Read the starter code. It contains four constants with the sizes of the two images, the
drawRailroadfunction explained in Section 56.6, and comments starting with// <<<at every place where your code goes. - Load the wagon. Add a second
p5.Imagevariable and loadtrain-carriage-wood.pnginsetup, withawait, like the railroad image. - One wagon function. Write
drawTrainWagon(ix: number): voidin analogy todrawRailroad, usingWAGON_WIDTHandWAGON_HEIGHT. The wagons are smaller than the segments, so they need their own step sizes. - Six wagons. Call it in a loop in
draw. Six wagons on five segments is correct; the wagon step is smaller than the segment step. - Three tracks (task 2). Wrap both loops in an outer loop that runs three times and ends with
translate(125, 100);. Each round shifts the origin to the next track, and the two inner loops draw the same thing again in the new place.
Images bring failure modes that shapes never had. A typo in the URL, a forgotten await, a size that squashes the picture, and the canvas stays empty or looks wrong with no error message to read. That is worth its own helper.
Images bring new failure modes: a typo in the URL, a forgotten await, a distorted size. This AI helper specializes in images and helps you in every exercise from now on.
56.8 Check your understanding
When your three tracks stand on the canvas and you can say why the wagons had to be drawn from right to left, take the short quiz below. You answer six questions about this chapter in your own words, and an AI reads your answers and tells you what you already understand and what you should read again. The quiz is anonymous, and answering in German is fine too.