35 Patterns: repeat, move, repeat
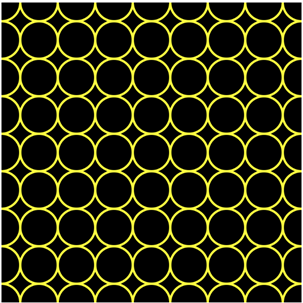
This chapter brings the loop tools together: nested for loops, translate, and the push/pop pair combine into one recipe that draws wallpapers, tilings, and textile patterns. Learn the recipe by heart, because you will use it every time a drawing repeats in rows and columns. You meet it twice, first in a finished program that you study and convert, then in a triangle pattern that you build yourself, including the professional touch of letting the pattern run over the edges.
35.1 AI tutor
Patterns built from loops and translates have many moving parts, and swapping any two of them changes the picture completely. If your pattern drifts, stacks, or vanishes, tell the tutor what you expected, what you see, and paste your loops.
Hints and questions instead of finished programs, in English or German.
35.2 The row recipe
Here is a finished pattern program, still with while loops; it is also the starting point of this chapter’s first exercise. Read it slowly; every line has a job:
let y: number = 0;
while (y <= SIZE) {
    // Save the current origin (start of the current row)
    push();

    let x: number = 0;
    while (x <= SIZE) {
        circle(0, 0, CIRCLE_DIAMETER);
        translate(CIRCLE_DIAMETER, 0); // move one step right
        x += CIRCLE_DIAMETER;
    }

    // Back to the start of the row
    pop();

    // Move one row down
    translate(0, CIRCLE_DIAMETER);
    y += CIRCLE_DIAMETER;
}
The rhythm of one outer round: note, draw across, back, down.
push()writes the note: “this is where the row starts.”- The inner loop draws the row: circle at the origin, step right, circle, step right, like a typewriter.
- After the row, the origin sits far off to the right.
pop()brings it back to the note, the row’s start. translate(0, CIRCLE_DIAMETER)moves one row down, and the next outer round begins there.
Could you skip the push/pop and translate back to the left by hand? You would have to know exactly how far the inner loop walked and undo it precisely. The note is simpler and always exact; this is the situation push and pop were made for.
Two details deserve a second look. First, the loop variables x and y never appear in a drawing command; they only count how far the row and column have come, while the real position lives in the origin, exactly like in the diagonal of circles (Section 34.3). Second, the conditions use <=, so the last circle of each row sits at the canvas edge and is half cut off. That is on purpose: patterns run to the edge, like wallpaper, not like a framed picture with margins.
35.3 Your exercise: Pattern with Push and Pop
The starter code is the finished while version. Your job is to understand it, then convert it.
- Read the starter code closely. Walk through the first outer round in your head: where is the origin after the third circle? After the
pop? After the row translate? - Convert both loops to for loops. The headers take over initialize, check, and update (Section 33.2); the
push,pop, and both translates keep their places. Run: the picture must not change. - Break it on purpose. Comment out the
pop()and predict the picture before you run. The rows start where the previous row ended, and the pattern staircases off the canvas. Put thepopback; you have just seen why the note matters.
35.4 Triangles in local coordinates
The second exercise tiles the canvas with triangles, and you build the recipe yourself. You need one new skill, drawing a shape around the origin. The pattern’s triangle looks like this:
triangle(0, 0, SIDE_LENGTH / 2, -HEIGHT, SIDE_LENGTH, 0);You measure all three corners from the current origin: the left corner of the base sits on the origin at (0, 0), the right corner one side length further at (SIDE_LENGTH, 0), and the tip above the middle of the base, at (SIDE_LENGTH / 2, -HEIGHT). The y value of the tip is negative, and that is no trick, because negative coordinates lie left of or above the origin. Since the origin moves with every translate, “above the origin” is exactly where a tip should be.
The height of the triangle comes from geometry. The pattern uses equilateral triangles (in German: gleichseitiges Dreieck, all three sides the same length), and an equilateral triangle with side length s has the height s * sqrt(3) / 2:
const HEIGHT: number = SIDE_LENGTH * sqrt(3) / 2;sqrt is the square root, a p5.js helper like floor and round. The exercise’s starter code spells it Math.sqrt; you know the chore (Section 27.6), and changing the spelling will be your first small task. The constant then does double duty, because the canvas itself is created with the height HEIGHT * 9; the drawing surface is computed from the pattern, not the other way around.
35.5 Level 2: over the edges
The triangle exercise has two levels. Level 1 places the first triangle exactly at the corner, and the pattern looks planned. Level 2 shifts the whole grid, half a side length to the left and half a height up. Now the edge rows and columns are cut in half, and the pattern looks like a piece of endless wallpaper.
The shift will need two small changes to your finished level 1 program, and both use ideas you already own. A translate before the loops moves the whole pattern’s starting point by half a side length and half a height, using negative values where the shift goes left or up (Section 34.2). And the loop bounds change a little so the cut shapes at the edges still get drawn, because loop bounds are ordinary numbers, and nothing stops a loop from starting at -SIDE_LENGTH / 2 or running one extra round. Fiddle with the pre-loop translate and the bounds until the picture matches the level 2 goal; that fiddling is the exercise.
35.6 Your exercise, part 2: Triangles
- The chore first. Change
Math.sqrtin the starter code tosqrt. - Understand the triangle line. Read the
trianglecall in the local-coordinates section (Section 35.4) until you can say where each of the three corners sits relative to the origin, and why the tip’s y value is negative. - Level 1: the grid. Build the row recipe around the triangle: inner loop draws and translates right by
SIDE_LENGTH, outer loop pushes, pops, and translates down byHEIGHT. Compare with the level 1 goal picture. - Level 2: the shift. Add the pre-loop translate and widen the bounds until the edges show clean half-triangles, as in the level 2 picture.
35.7 Check your understanding
The row recipe pulls the whole loop toolbox together: with it, you can repeat, decide inside loops, nest loops, and move the paper under the pen. Take the short quiz below. You answer six questions about this chapter in your own words, and an AI reads your answers and tells you what you already understand and what you should read again. The quiz is anonymous, and answering in German is fine too.