30 Pixel X and zebra stripes: the loop variable works harder
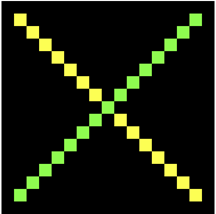
The grid gave you a finished loop to copy, and the rays came with a half-written program. This chapter takes the training wheels off: two exercises, two empty canvases, and you write every loop yourself. Both drawings look simple, and both hide a new skill. The pixel X teaches you to compute with the loop variable, so that one variable places two squares in one round. The zebra stripes teach you a second style of loop, where the variable counts rounds instead of measuring pixels, and where an if inside the loop body lets every second round act differently.
30.1 AI tutor
Writing a loop from scratch is different from completing one. If your diagonal bends the wrong way or your stripes are all one color, show the tutor your loop and your loop table; the mistake is usually visible in the table.
Hints and questions instead of finished programs, in English or German.
30.2 Computing with the loop variable
Start with the first diagonal of the X. The canvas is 425 pixels, each square 25, and the X keeps one empty cell on every side, so the squares sit at 25, 50, and so on up to 375. On the first diagonal a square sits at every position where x and y are equal, so one rect with the loop variable in both slots draws the whole diagonal:
rect(i, i, GRID, GRID);The second diagonal is the mirror image. When the yellow square is near the top, the lime square is near the bottom. Mirroring a position means subtracting it from the canvas height, roughly height - i. But remember how rect measures: its first two arguments are the top left corner of the rectangle. So height - i would put the square’s top edge where its bottom edge belongs, one cell too low. The correct top edge sits one grid step higher:
rect(i, height - GRID - i, GRID, GRID);One loop, one variable, and each round places a yellow square at (i, i) and a lime square at (i, height - GRID - i). The loop variable is no longer just a position you draw at; it is a value you compute with.
Before you trust an expression like height - GRID - i, feed it the first and the last value of the loop. In the first round, with i = 25 and height 425, the lime square lands at y = 375, one cell above the bottom edge. In the last round, with i = 375, it lands at y = 25, one cell below the top edge. Both ends look right, so the middle will be right too. Two small calculations catch most mirror mistakes.
30.3 Your exercise: Pixel X
The canvas is 425 pixels, the squares are 25, and the X keeps a margin of one empty cell on every side. The starter code contains only the canvas setup and noStroke().
- Plan the loop. The canvas is 17 cells of 25 pixels, and the margin eats the first and the last cell: the first square sits at (25, 25), the last at (375, 375). So your loop runs from
GRIDwhilei < SIZE - GRID. - Draw the yellow diagonal alone. Four steps, one
rect(i, i, GRID, GRID)in the body,fill("yellow")before it. Run. - Derive the lime expression, as in the section above, then add
fill("lime")and the mirroredrectto the same loop body. Like the rays, the body switches colors every round: fill, yellow square, fill, lime square. - Check the crossing. In the middle of the X, the two diagonals meet. Which color wins there, and why? Think about the order of the two
rectcalls in your body.
30.4 Counting instead of measuring
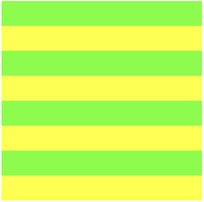
All your loops so far measured pixels; i was an x or y coordinate, and the update jumped one grid step. For the zebra stripes, a second style is more natural: let the variable count the stripes, 0, 1, 2, 3, and compute the position from the count when you need it. Stripe number i starts at y = i * STRIPE_THICKNESS:
let i: number = 0;
while (i * STRIPE_THICKNESS < SIZE) {
    // draw stripe number i
    i += 1;
}
Both styles are correct, and you will use both. The measuring style is direct: the variable is the position. The counting style keeps the round number, and that is what you need here, because the stripe’s number decides its color.
Counting up by one is so common that TypeScript has an extra-short form for it: i++ does exactly what i += 1 does. Until now the course held the ++ back; from this chapter on you may use it, but only for steps of one. For every other step size, += stays the right tool.
30.5 A decision inside the loop
The loop body may contain any statements, including an if. Every round can look at the loop variable and act differently:
if (i % 2 === 0) {
    fill("lime");
} else {
    fill("yellow");
}
The test i % 2 === 0 is the modulo operator in its parity role. You used % 2 in the binary chapter to split off the last binary digit (Section 25.2); the answer is 0 for even numbers and 1 for odd ones, even, odd, even, odd, in exactly the rhythm a zebra needs. Stripes 0, 2, 4, and 6 come out lime, stripes 1, 3, 5, and 7 yellow.
30.6 Your exercise: Zebra Stripes
The canvas is 400 pixels, each stripe 50 thick, and the rule of the exercise is strict: your output must match the goal picture exactly, and you may use only a single while loop.
- Make a loop table with four columns:
i, the stripe’s y positioni * STRIPE_THICKNESS, the value ofi % 2, and the color. 400 divided by 50 is eight stripes, soicounts 0 to 7, and the goal picture tells you which color stripe 0 must get. - Write the loop: the counting skeleton from above, the
ifdeciding the fill, then onerectfor stripe numberi. It spans the full canvas width and isSTRIPE_THICKNESStall. - Change the constants.
STRIPE_THICKNESS = 25must give 16 thinner stripes,STRIPE_THICKNESS = 100four fat ones, with the colors still alternating from the same starting color.
30.7 Make it smarter: draw only half the stripes
Look at your finished zebra once more. The loop draws eight stripes, and four of them are the same color. If the whole canvas were lime before the loop starts, the lime stripes would already be there. One background("lime") paints the canvas, and the loop only has to add the yellow stripes on top.
That changes the loop, and for the better. It no longer needs to visit every stripe; it can jump straight from one yellow stripe to the next: start at stripe 1 and count in steps of two, i += 2. And the if in your loop body loses its job, because a loop that only visits yellow stripes has no decision left to make; the whole if and else can go. Same picture, half the rounds, and one branch less.
Try it. Rewrite your zebra program into this form: paint the canvas lime, remove the if, let the loop count in twos. Check that the picture stays exactly the same, also after you change STRIPE_THICKNESS.
This rewrite shows how a lot of real programming works. First you write the obvious version, the one that follows the task word for word. Eight stripes, so draw eight stripes. Then you look at the working code and ask whether it could be simpler. The obvious version is not wasted work; it is the step that lets you see the shortcut. And simpler code is more than pretty, because fewer lines and fewer decisions mean fewer places for a bug to hide. You met this rhythm once before, when an AI shrank the dice’s 21 circle statements down to a handful (Section 22.7), and you will meet it again and again. First make it work, then make it simpler.
30.8 Check your understanding
When your X crosses cleanly and your zebra wears its stripes, take the short quiz below. You answer six questions about this chapter in your own words, and an AI reads your answers and tells you what you already understand and what you should read again. The quiz is anonymous, and answering in German is fine too.