28 The while loop: teaching the computer to repeat
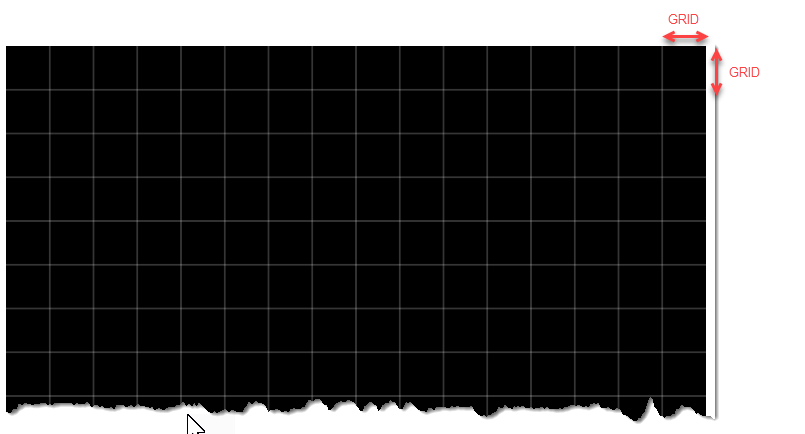
Look at the drawing above and count what it takes. It needs 15 vertical and 15 horizontal lines, 30 line statements that differ in exactly one number. You could type them all. You typed six circle calls for the dice faces, and it already felt like work. This part of the book gives you the tool that makes such typing unnecessary: the loop, a way to tell the computer “do this again, with the next number, until I say stop”. Loops are the biggest step in this course so far. A program with loops can do thousands of things with a few lines of code, and from now on your drawings can be as rich as you like without your fingers paying for it.
28.1 AI tutor
Loops are new territory, and the first loop that runs away or draws nothing can be confusing. The tutor of this part knows everything about the while loop. Show it your loop and tell it what you expected and what you got.
Hints and questions instead of finished programs, in English or German.
Watch out for one danger before you write your very first loop. A loop repeats until its condition says stop, and it is surprisingly easy to write a loop whose condition never says stop. Such a loop is called an endless loop (programmers also say infinite loop), and everyone who learns loops produces one sooner or later. The playground cannot rescue you from it: the browser tab freezes, the buttons stop reacting, and the only way out is to close the tab and open the playground again. Everything you typed since your last save is gone at that moment.
The playground can save your work locally in the browser or in GitHub. Save often, and always save right before you run code with a loop you are not completely sure about. Saving takes a second; typing a lost program in again takes a lot longer.
28.2 Thirty statements, one idea
Here is the honest, loop-free way to draw the vertical lines of the grid, with the canvas 400 pixels wide and a line every 25 pixels:
line(25, 0, 25, 400);
line(50, 0, 50, 400);
line(75, 0, 75, 400);
// ... and twelve more of these ...
Every statement is the same except for one number, and that number grows by 25 each time. Reading it out loud sounds like a robot: “line at 25, line at 50, line at 75”. And the worst part comes later. If you want a finer grid with a line every 20 pixels, you have to rewrite every single statement.
What you’d rather tell the computer is the idea behind the column: “start at 25; as long as you haven’t reached the right edge, draw a line and move 25 to the right.” That sentence is a while loop, almost word for word.
28.3 The while loop: four steps
Here is that sentence in TypeScript. SIZE is the canvas size (400) and GRID is the distance between lines (25), both constants:
let i: number = GRID;    // STEP 1: Initialize the loop variable
while (i < SIZE) {       // STEP 2: Check the loop condition
    line(i, 0, i, SIZE); // STEP 3: Do whatever you want to do repeatedly
    i += GRID;           // STEP 4: Update the loop variable
}
The variable i is called the loop variable. It is the loop’s memory: it stores how far the work has come. Here it holds the x position of the next line to draw. The four steps around it:
- Initialize. Before the loop starts, the loop variable gets its starting value. The first line belongs at
x = GRID, soistarts atGRID. - Check. The condition between the parentheses works exactly like the condition of an
if: a comparison that istrueorfalse. As long as it istrue, the loop keeps going.i < SIZEreads as “the next line is still on the canvas”. - Do the work. The statements between the braces are the loop body. They run once per round. Our body draws one vertical line at
x = i. - Update. The last statement of the body moves the loop variable forward:
i += GRIDshifts the position one grid step to the right. You know+=from the bouncing ball (Section 23.3).
After the update, the computer jumps back to step 2 and checks the condition again, with the new value of i. Check, work, update, check, work, update, until the check says false. Then the computer skips past the closing brace and the program continues.
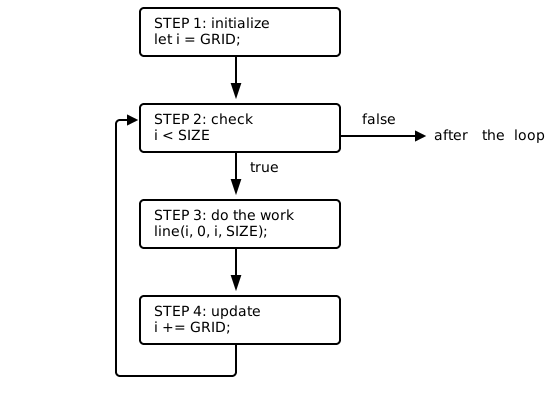
One detail of the picture deserves a second look. The check comes before the work, every time. When the condition is false at the very first check, the body never runs at all. A while loop can run zero times, and sometimes that is exactly right: on a canvas smaller than one grid step, the correct number of lines is none.
let i: number = GRID; declares a variable like every other declaration, so it carries its data type. The rule from the Variables part (Section 12.3) has no exception for loops, and that stays true for every loop shape in this book. Code you find on the web often leaves the type out in a loop, because TypeScript can work it out on its own. In this course you write it, every time.
i is short for index and is the traditional name for a loop variable; programmers have used it for generations, and everyone reads i as “the loop is counting here”. For a loop variable with a clear meaning, a speaking name like x or diameter is just as good. Meaningless names like temp, helper, thing, or stuff stay forbidden for everything else, because the naming rules from the Variables part (Section 12.4) still apply.
28.4 Play computer: the loop table
You can’t watch the computer run a loop, but you can be the computer. Take paper and pencil and walk through the loop one round at a time, writing down the loop variable, the check, and the work. The result is a loop table. To keep it short, shrink the numbers first: here is the vertical-line loop with SIZE = 100 and GRID = 25.
i |
i < 100? |
what happens |
|---|---|---|
| 25 | true |
line at x = 25, then i becomes 50 |
| 50 | true |
line at x = 50, then i becomes 75 |
| 75 | true |
line at x = 75, then i becomes 100 |
| 100 | false |
the loop ends |
Three lines, at 25, 50, and 75. Notice the two edges of the table. The loop starts at GRID, not at 0, because a line at x = 0 would lie on the canvas border where nobody sees it. And the line at x = 100 is never drawn, because 100 < 100 is false: the condition < keeps the last line off the right border. Both edges are design decisions, and the loop table makes them visible before the program ever runs.
Before you run a loop you just wrote, trace it in a loop table with small numbers, like the table above. The table costs two minutes and shows you the first value, the last value, and the number of rounds. Most loop bugs, wrong start, wrong condition, forgotten update, are visible on paper before the browser ever sees the code. The following chapters won’t repeat this instruction every time; the technique is yours now, and it helps with every loop you write from now on.
28.5 The loop that never stops
What happens when step 4 is missing?
let i: number = GRID;
while (i < SIZE) {
    line(i, 0, i, SIZE);
    // the update is missing
}
Play computer: i is 25, the check says true, a line appears, and i is… still 25. Check true, line, still 25. The condition can never become false, so the loop never ends. This is the endless loop from the start of the chapter (Section 28.1), and now you can see exactly how one happens. The classic cause is a forgotten update.
An endless loop shows no error message and no red squiggle: the code is legal, it just never finishes. The browser tab simply freezes, the drawing stays blank, and clicking does nothing. When that happens, close the tab, open the playground again, and read your loop in four-step order: is the variable initialized? Can the condition ever become false? Does the update actually move the variable toward the end? And save before you run the repaired loop, in case the second try freezes too. Try to produce an endless loop on purpose in the playground and see what happens. It will prepare you for a mistake that you will make sooner or later.
28.6 Two loops, one variable
The grid needs a second set of lines, and the horizontal loop is the mirror image of the vertical one. Only the line arguments change. A horizontal line at height i runs from the left edge to the right edge, so start and end swap their roles: line(0, i, SIZE, i).
The second loop can reuse the variable of the first one. But careful: i already exists, so declaring it again with let gives you a red squiggle. A plain assignment resets it instead:
i = GRID;                // back to the start: assignment, no let
while (i < SIZE) {
    line(0, i, SIZE, i);
    i += GRID;
}
let i happens once; after that, the variable belongs to the whole function and every loop in it may use it. Resetting the loop variable before the loop is just step 1 in different clothes.
Reusing i works here because the two loops run one after the other. When a program really needs two counter variables at the same time, programmers traditionally call the second one j, simply the next letter of the alphabet. Everyone reads i and j as a pair of counters, just like everyone reads i alone as “the loop is counting here”.
28.7 Your exercise: Grid
Now build the grid yourself. The starter code contains the finished vertical-line loop, with the four steps marked as comments. Your job is the horizontal lines.
- Read the starter code. Find the four steps of the vertical loop and match them to the comments. Say the loop out loud: “start at 25, while the edge isn’t reached, draw and move on.”
- Write the horizontal loop. Reset
iwith an assignment, keep the condition and the update, and swap thelinearguments as shown above (Section 28.6). Run after every few keystrokes. - Change the constants. Set
GRIDto 50, then to 20, then putSIZEto 300. The grid must adapt by itself every time; that is the point of writing loops with constants instead of 30 statements with numbers in them.
28.8 Your exercise, part 2: Step Lines
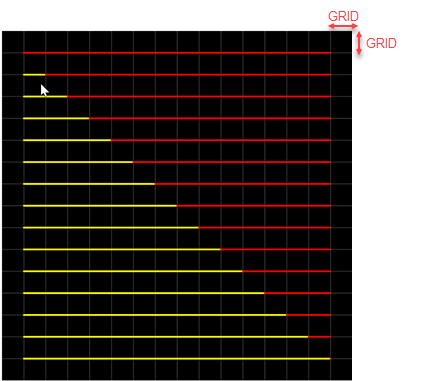
The second exercise starts where the grid ends, with both grid loops already in the starter code. On top of the grid you draw colored lines, one per row, and their lengths change from row to row. That is the new idea of this exercise: the loop variable can do more than one job. i is the height of the row, and at the same time it decides how long the yellow part is.
Look at the picture: in every row, yellow and red meet on the diagonal, and the diagonal is exactly where x equals y. So in the row at height i, the yellow line runs from x = GRID to x = i, and the red line continues from x = i to x = SIZE - GRID.
- Read the given code. The two grid loops are your own solution. Below them, the starter sets
strokeWeight(2)andstroke("yellow")once, before your loop. Settings placed before a loop apply to every round, so all yellow lines get the same look without repeating the command inside the body. - Make a loop table for the yellow loop with
SIZE = 100andGRID = 25, with one extra column: where does the yellow line start, where does it end? The first row’s line is tiny (from 25 to 25), and that is fine. - Yellow first. Write the yellow loop and run it. Only when the yellow staircase looks right, add the red loop after the
stroke("red")line. - Change the constants.
GRID = 50,GRID = 20,SIZE = 300: the staircases must follow the grid by themselves.
28.9 Check your understanding
When your grid and your staircases work, take the short quiz below. You answer six questions about this chapter in your own words, and an AI reads your answers and tells you what you already understand and what you should read again. The quiz is anonymous, and answering in German is fine too.